Business Central · Updated · 6 min read · 34 screenshots

5 simple ways to apply vendor payment with vendor invoice

On this page 6 sections
  1. 1. Applying advance payment with invoice
  2. 2. Apply after both the entries are posted
  3. 3. Apply invoice when posting payment on journal
  4. 4. Payment from vendor card with application
  5. 5. Payment from vendor ledger
  6. Conclusion

Introduction: Managing payments and invoices can be complex, but Business Central makes it easier with multiple ways to apply payments directly to invoices. Whether you’re applying an advance payment, processing invoices after posting, or using the vendor card, Microsoft Dynamics 365 Business Central has got you covered!

In this post, we explore step-by-step how to apply advance payments, post invoices, and manage payments in various ways. If you are already a user, you are using one or two of these methods but knowing them all will give you extra flexibility in how you use the system and be more efficient.

1. Applying advance payment with invoice

Let’s say you made an advanced payment which reflects in your vendor’s ledger and is waiting for the invoice to be posted in the future. The time arrives when the invoice needs to happen, and you know at the time of posting the invoice which payment it should be applied to. You don’t have to post the invoice and then apply payment with it. You can do it from within the invoice card.

To understand this scenario, let’s first post a payment entry to the vendor as an advance payment,

Go to ‘Bank Payment Voucher’ by typing the same in the global search bar,
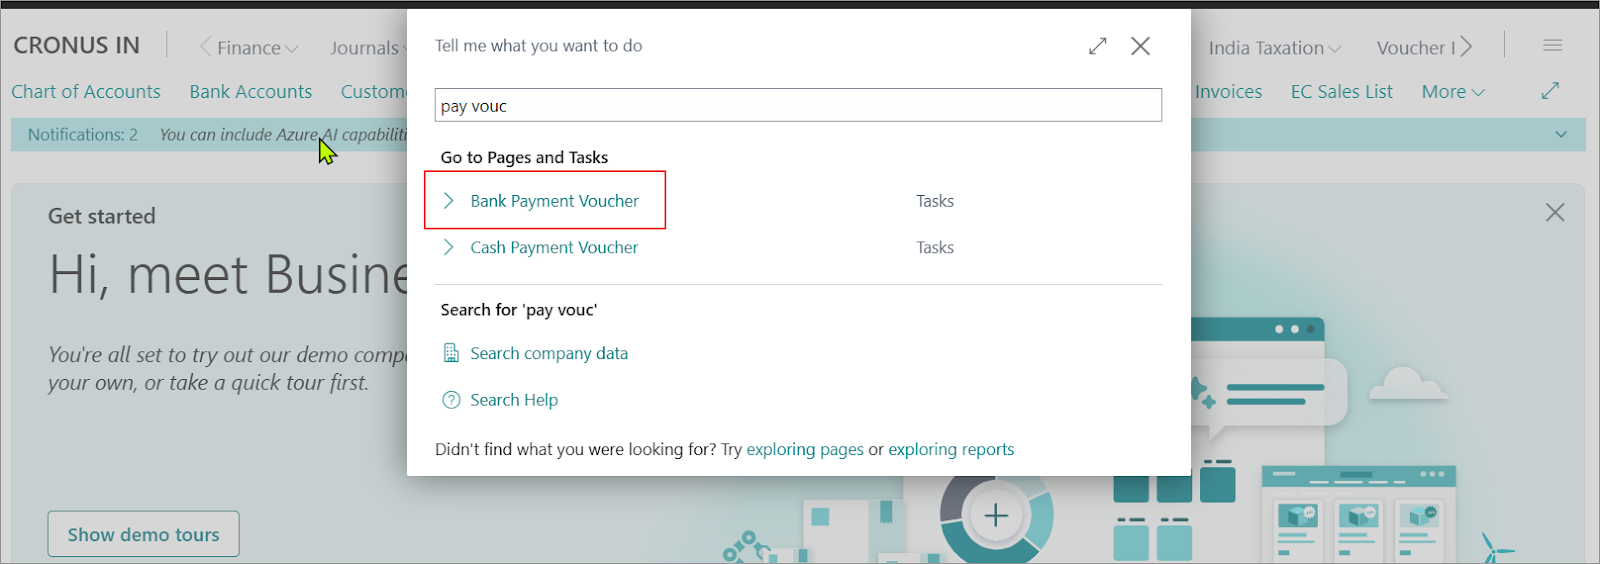
Screenshot 1 of 34 for “5 simple ways to apply vendor payment with vendor invoice”

Fill in the necessary fields that complete a payment entry. If you have made the payment online, then you just want to make vendor to bank entry.

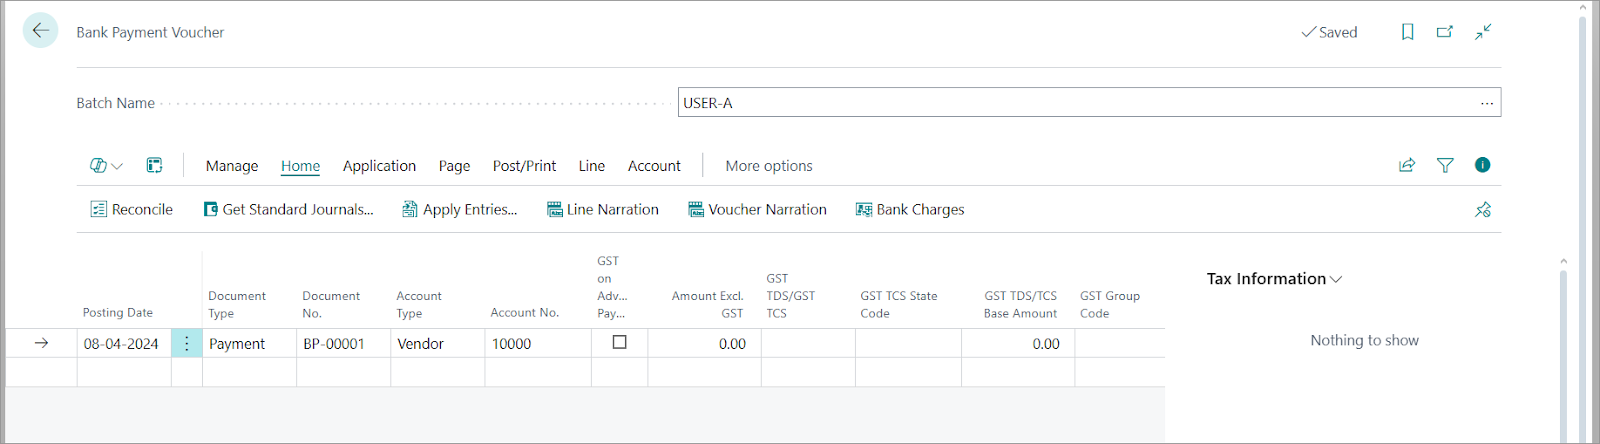
When you click on ‘Bank Payment Voucher’ as shown above then you will be able to create the vendor payment entry
Screenshot 2 of 34 for “5 simple ways to apply vendor payment with vendor invoice”

List of important fiends on this page:

  • Posting Date: Usually, the date when the payment is being made
  • Document Type: In case of payment (or receipt) select ‘Payment’
  • Document No.: From number series or manual depending on what you setup
  • Account Type: In case of vendor payment, this will be ‘Vendor’
  • Account No.: You can select the vendor number here to which you would like to post the payment entry
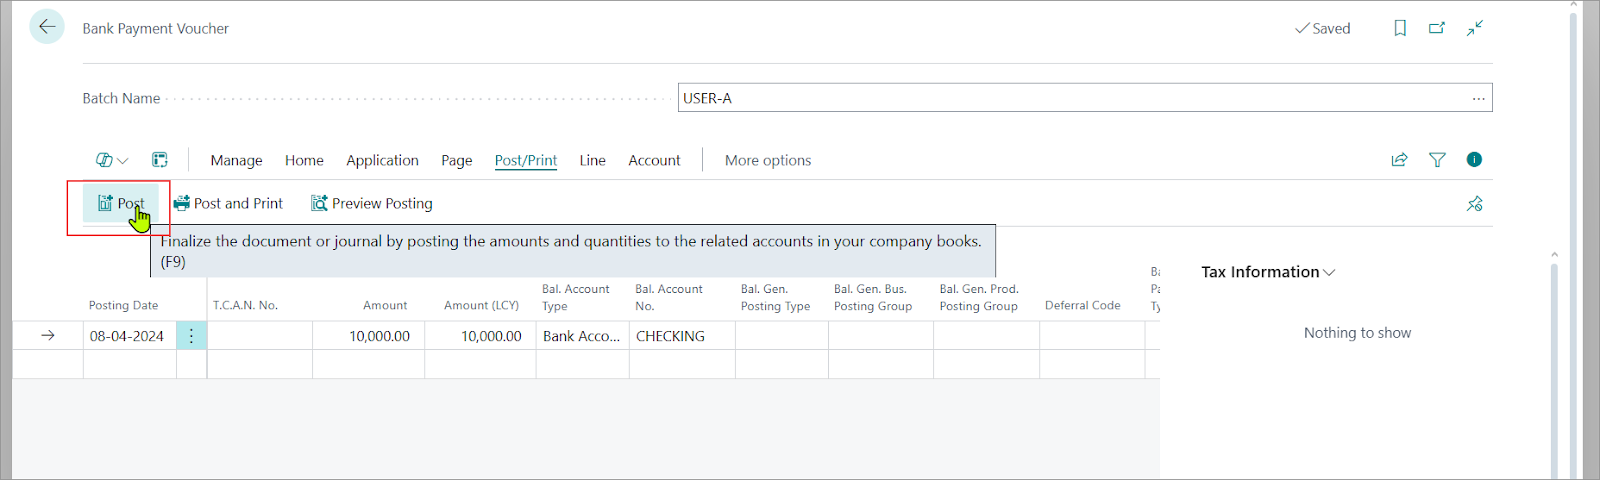
  • Amount: This will be the amount in the currency that you are posting the transaction in
  • Bal. Account Type: If the payment is made from a Bank then select ‘Bank Account’ here
  • Bal. Account No.: This will be the bank you select since you selected type as ‘Bank Account’
  • Comment/Line Narration/Voucher Narration: You have the ability to write information which you would like to use for future.

You will see that some fields are auto filled from the accounts we select in this entry. In general, you can leave them as it is.

Now, let’s post this payment.
Screenshot 3 of 34 for “5 simple ways to apply vendor payment with vendor invoice”


The payment is posted and now you receive the invoice from this vendor. The invoice is a different amount than the payment received (it could be the same also, but let’s take a unique scenario but you still want to apply the invoice with this payment.

Create Invoice,

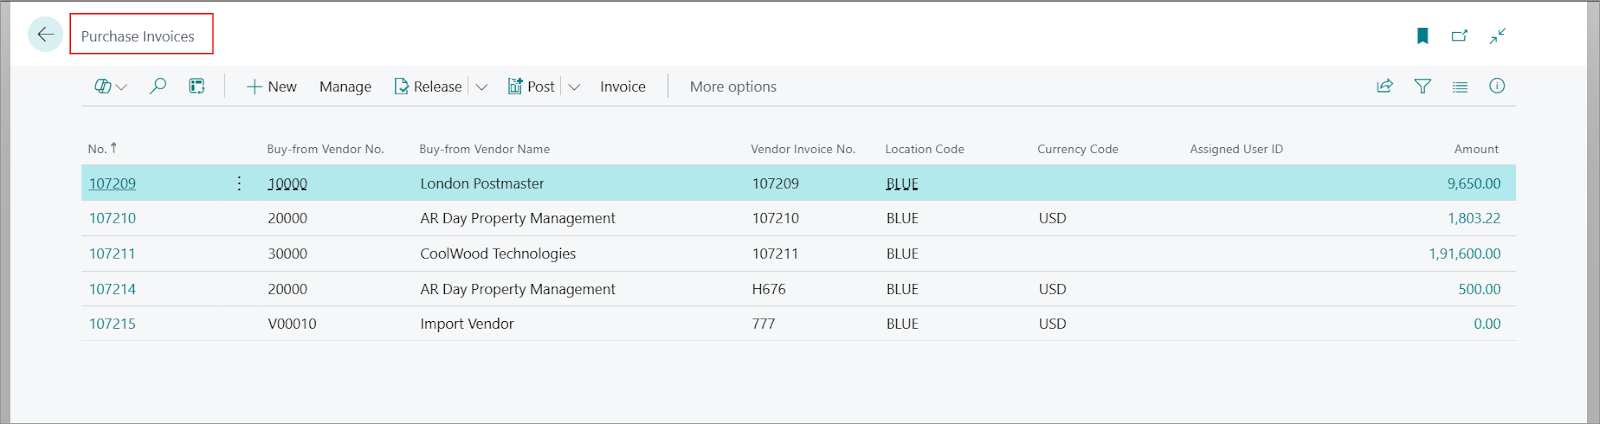
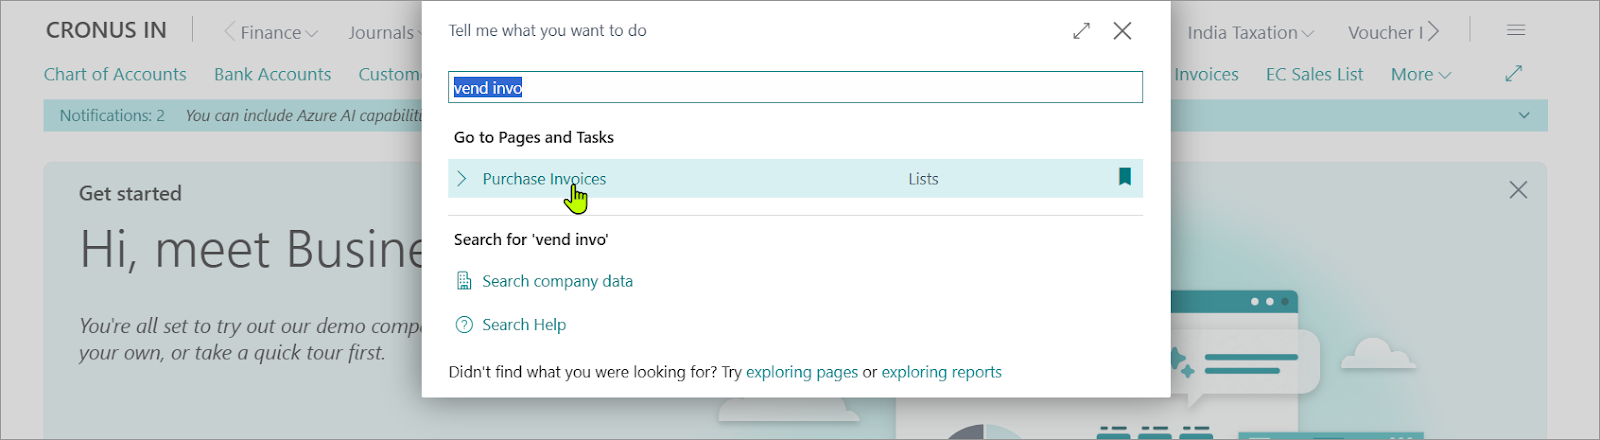
Search ‘Purchase Invoice’ in the search bar and fill in the required details.
Screenshot 4 of 34 for “5 simple ways to apply vendor payment with vendor invoice”

You click on ‘New’ to create a new invoice

Screenshot 5 of 34 for “5 simple ways to apply vendor payment with vendor invoice”

You select the vendor and insert lines. We will not discuss invoice creation in detail and jump right into the assignment option,

Screenshot 6 of 34 for “5 simple ways to apply vendor payment with vendor invoice”

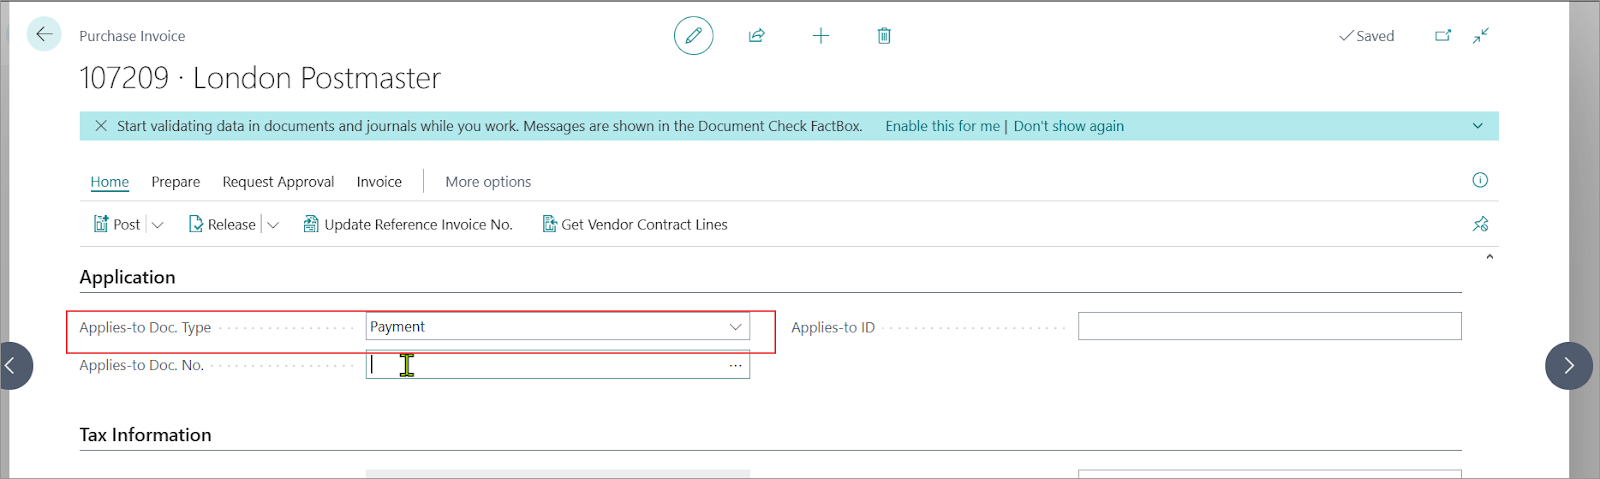
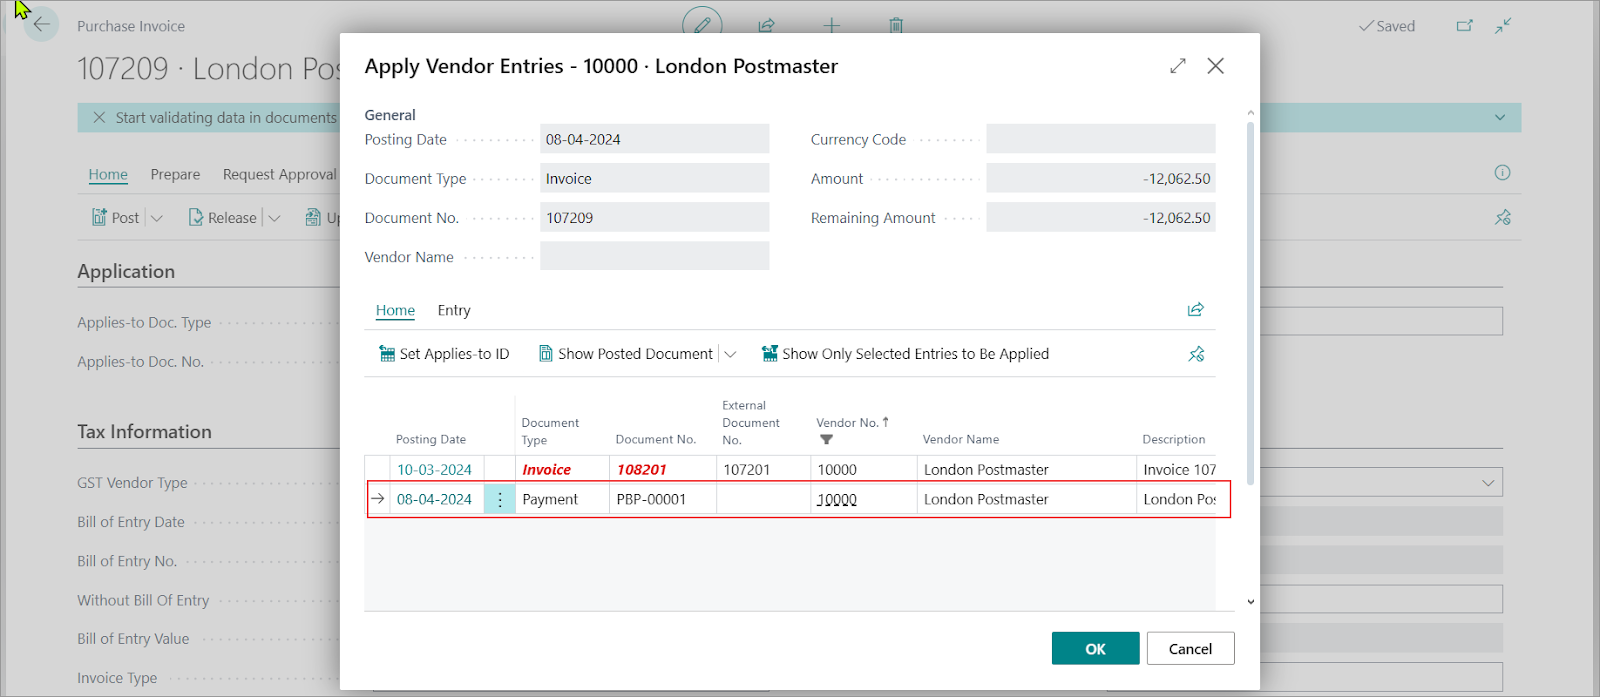
Next when you click on the ‘Applies-to Doc. No.’ you will have the option to select the payment entry you would like to apply with this invoice.

Screenshot 7 of 34 for “5 simple ways to apply vendor payment with vendor invoice”

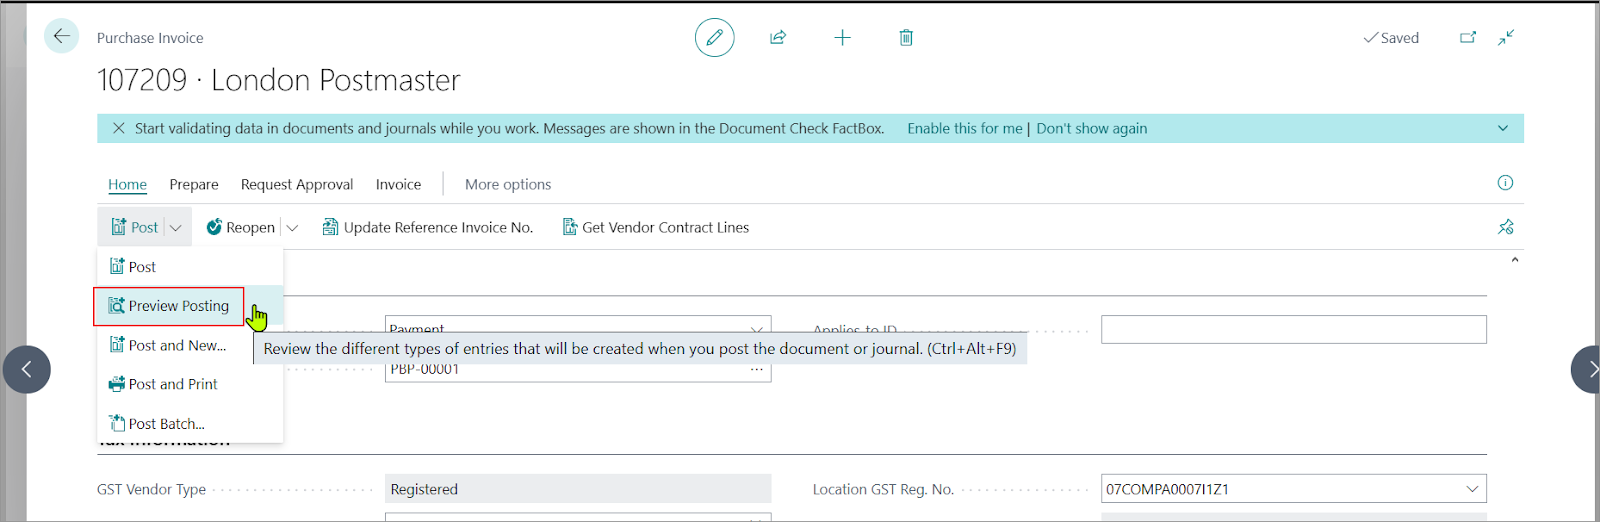
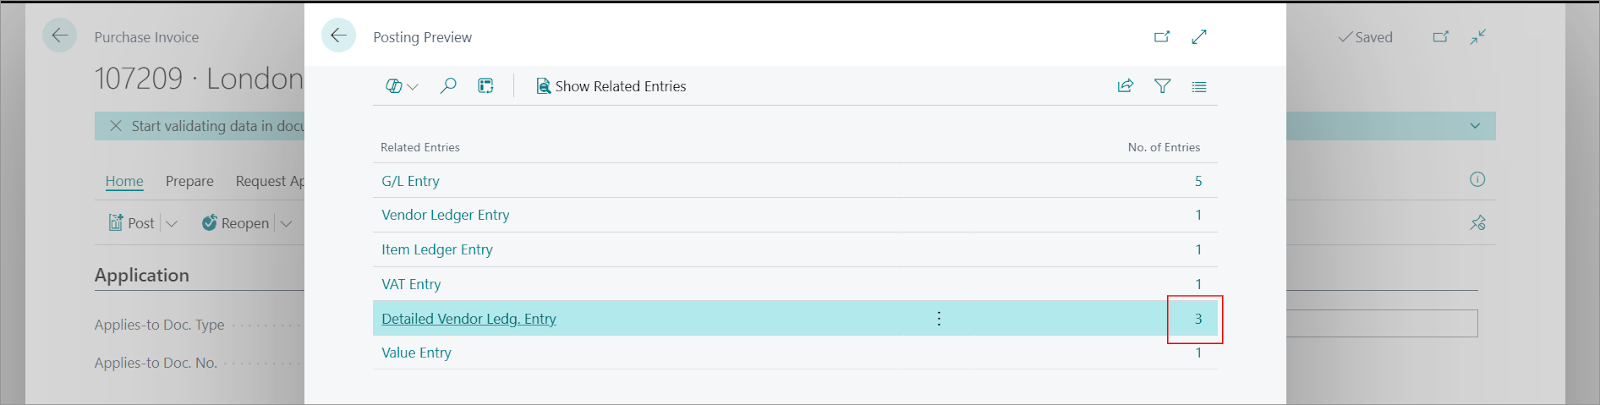
After selecting the entry, you can go ahead ad post the entry. But let’s check the ‘Preview Posting’ of this entry to check what it looks like,
Screenshot 8 of 34 for “5 simple ways to apply vendor payment with vendor invoice”
Screenshot 9 of 34 for “5 simple ways to apply vendor payment with vendor invoice”

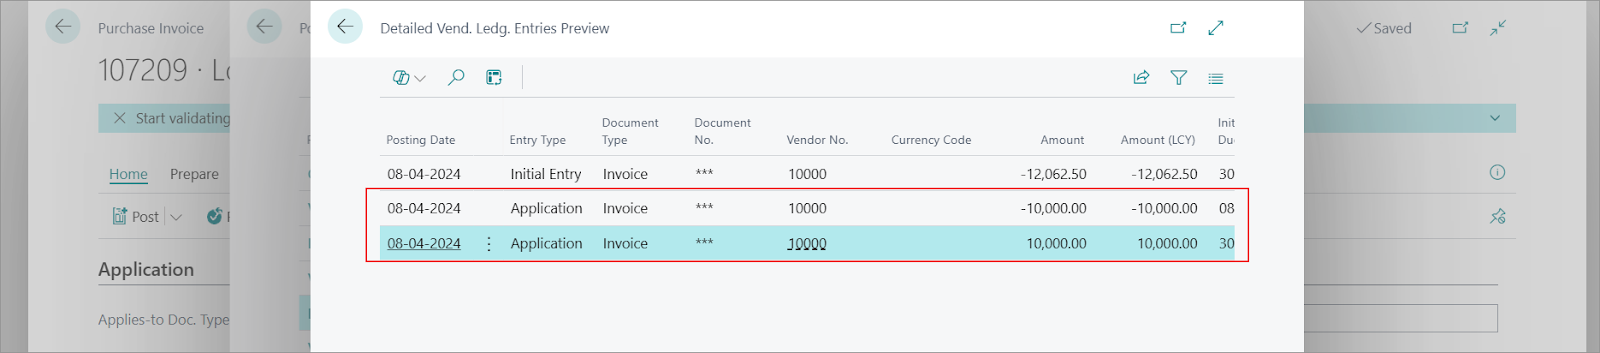
Let’s check the ‘Detailed Vendor Ledg. Entry’
Screenshot 10 of 34 for “5 simple ways to apply vendor payment with vendor invoice”

Here we can see that the application to the advance payment has been done. You can now go ahead and post tne purchase invoice.

2. Apply after both the entries are posted
You may post invoice first and payment second and vice versa, and you do not have to apply them with each other at the time of entry.
To apply invoice and payment after posting, go to vendor ledger.
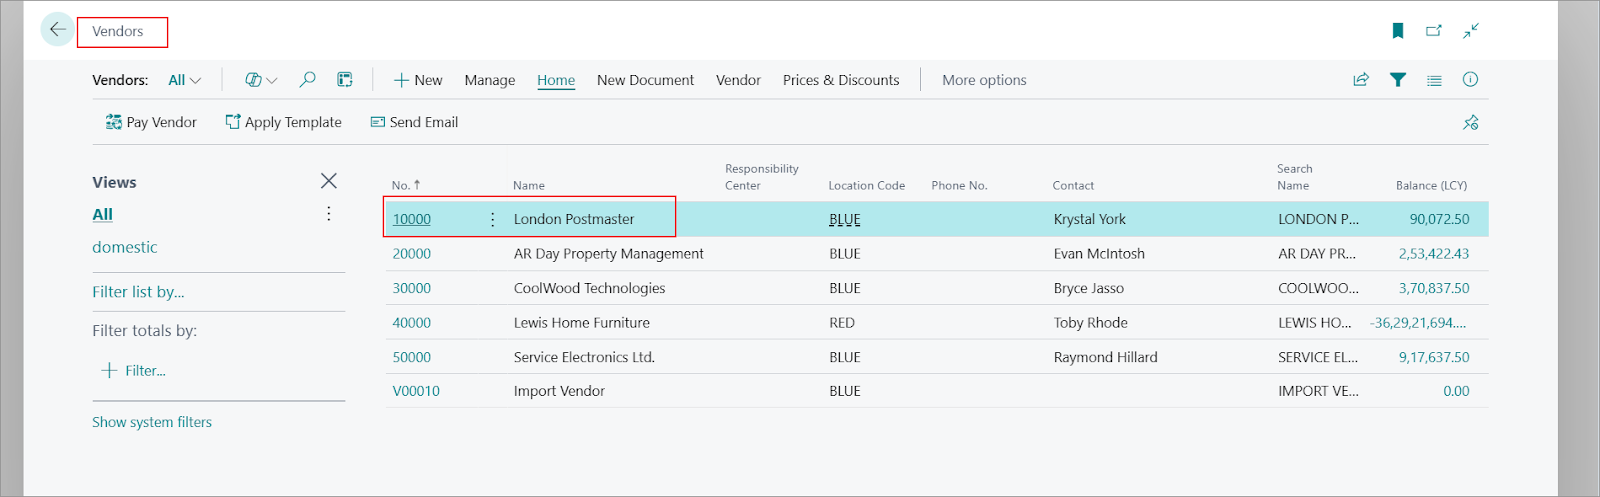
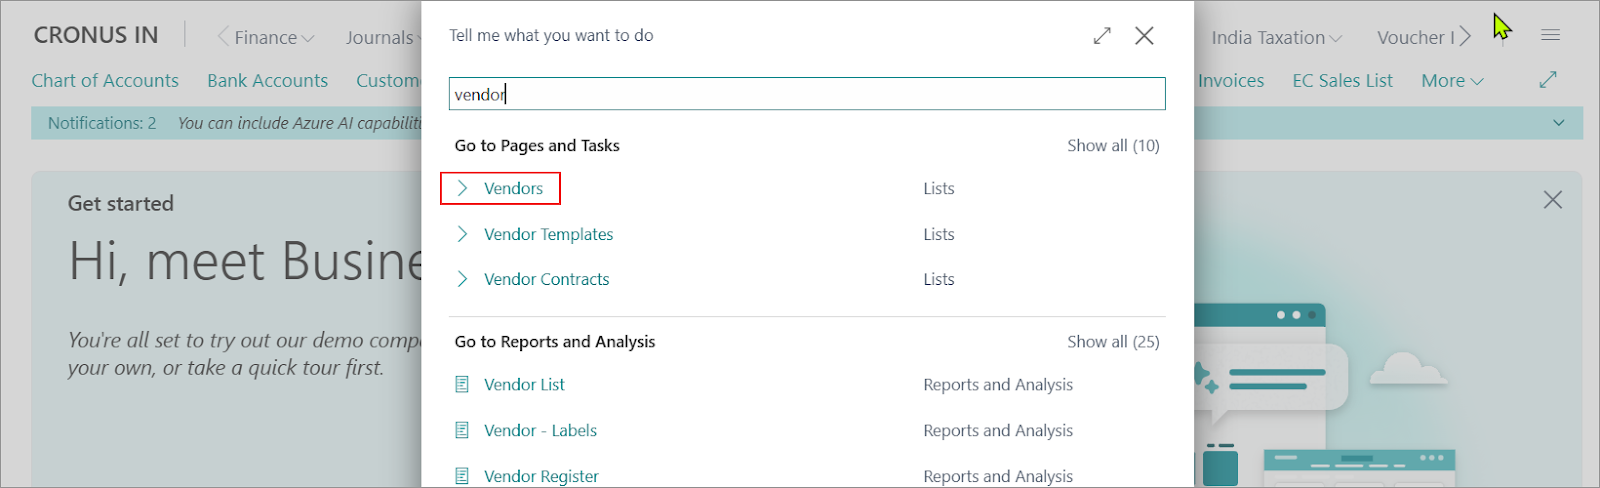
Search ‘Vendors’ in the search bar and find the vendor you want to check ledger for

Screenshot 11 of 34 for “5 simple ways to apply vendor payment with vendor invoice”

Open the vendor card from the list,

Screenshot 12 of 34 for “5 simple ways to apply vendor payment with vendor invoice”

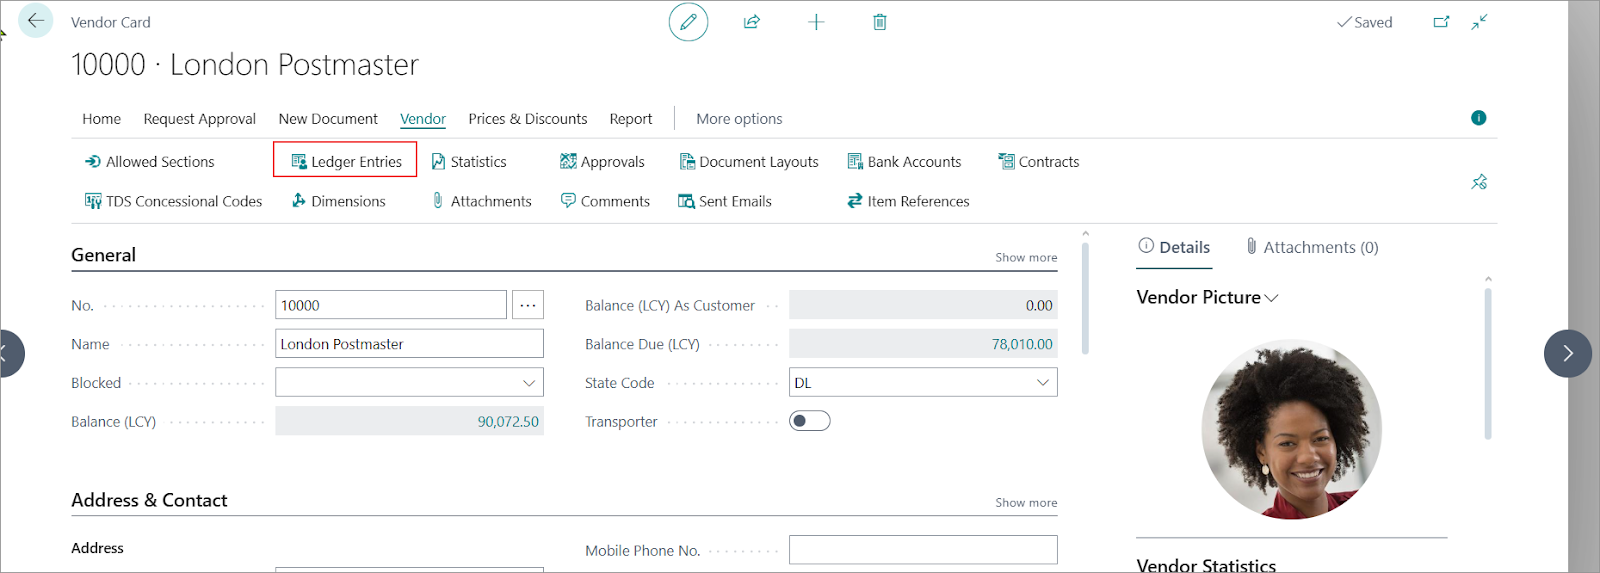
Once you click on the vendor no., the vendor card opens
Screenshot 13 of 34 for “5 simple ways to apply vendor payment with vendor invoice”

Now, let’s click on ‘Ledger Entries’ and reach to the list
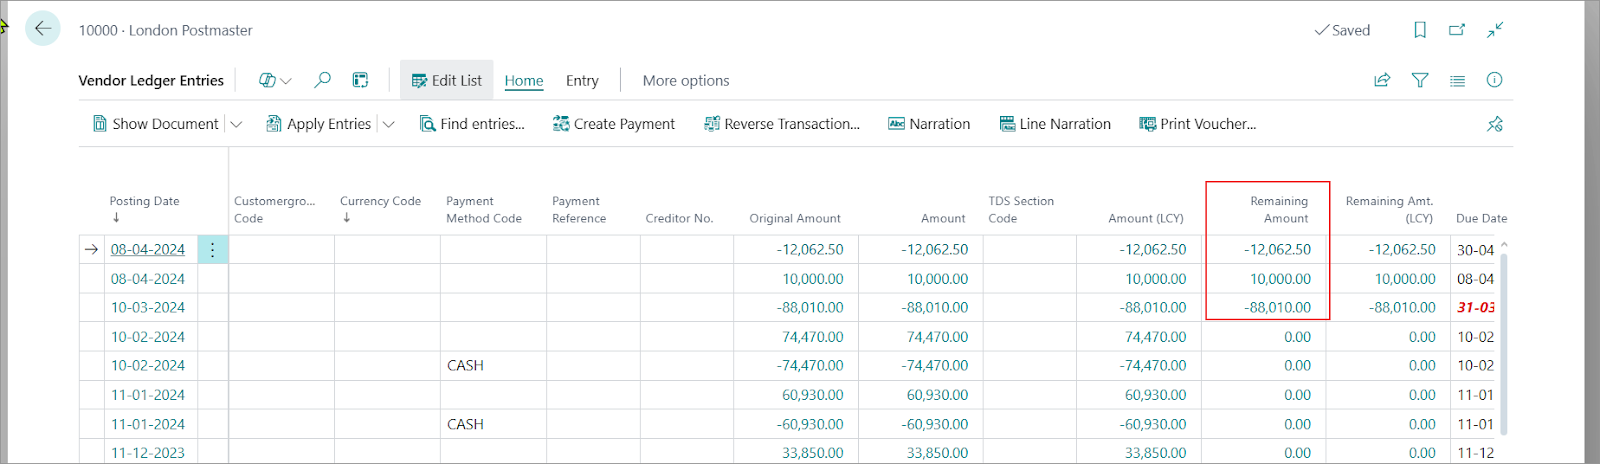
Screenshot 14 of 34 for “5 simple ways to apply vendor payment with vendor invoice”

The ‘Remaining Amount’ shows the entries that are yet to be applied. You can select one and click on ‘Apply Entries’ option as shown below,
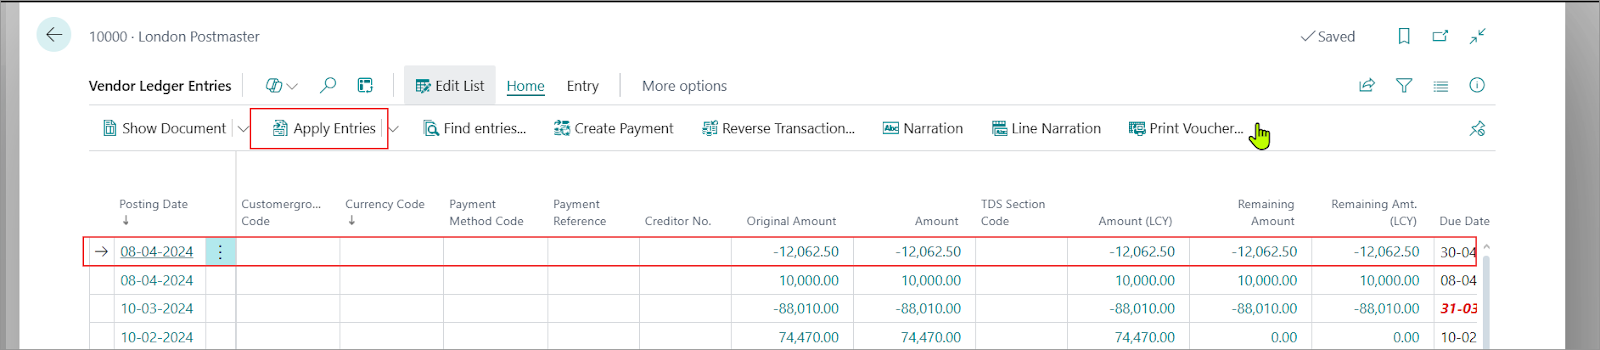
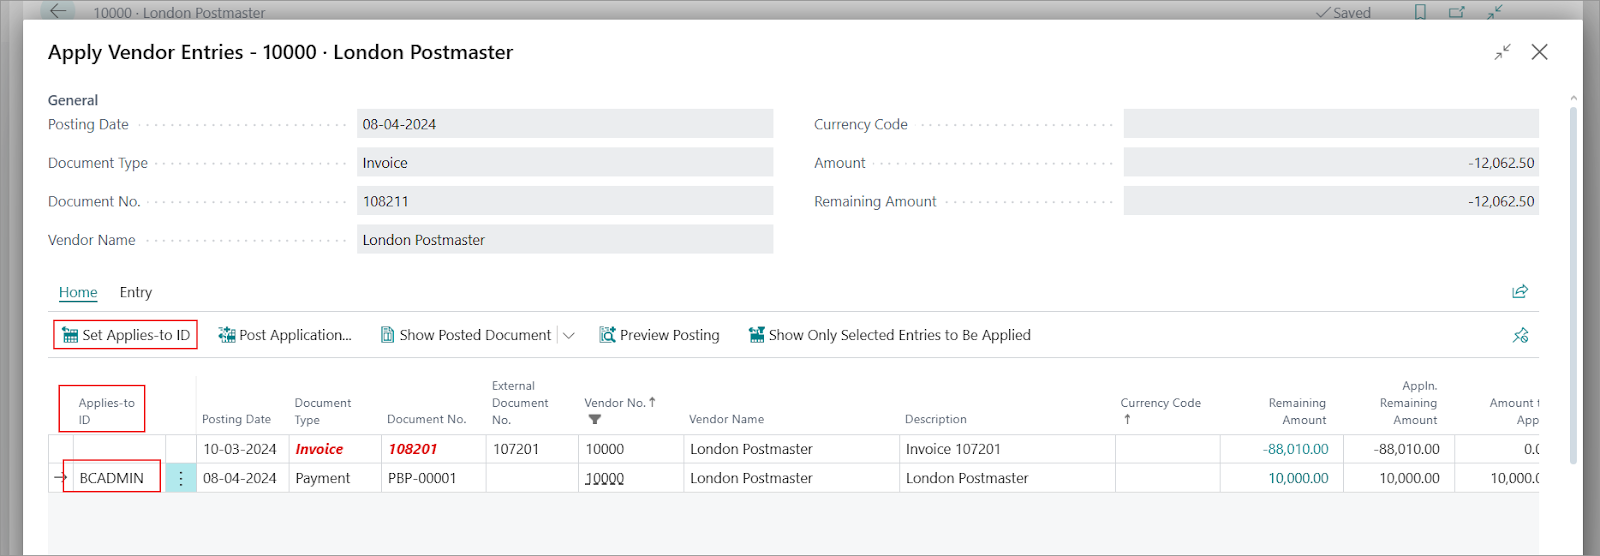
Screenshot 15 of 34 for “5 simple ways to apply vendor payment with vendor invoice”

The application page will allow you to select the entry you would like to apply with by selecting the entry and click on ‘Set Applies-to ID’. In below example, when clicked on Set Applies-to ID, it generated user’s name as the applies to ID.

Screenshot 16 of 34 for “5 simple ways to apply vendor payment with vendor invoice”

Now you can go ahead and post the application. You will see a pop up window as shown below. The ‘External Document No.’ can be used to enter any reference number for this application entry.
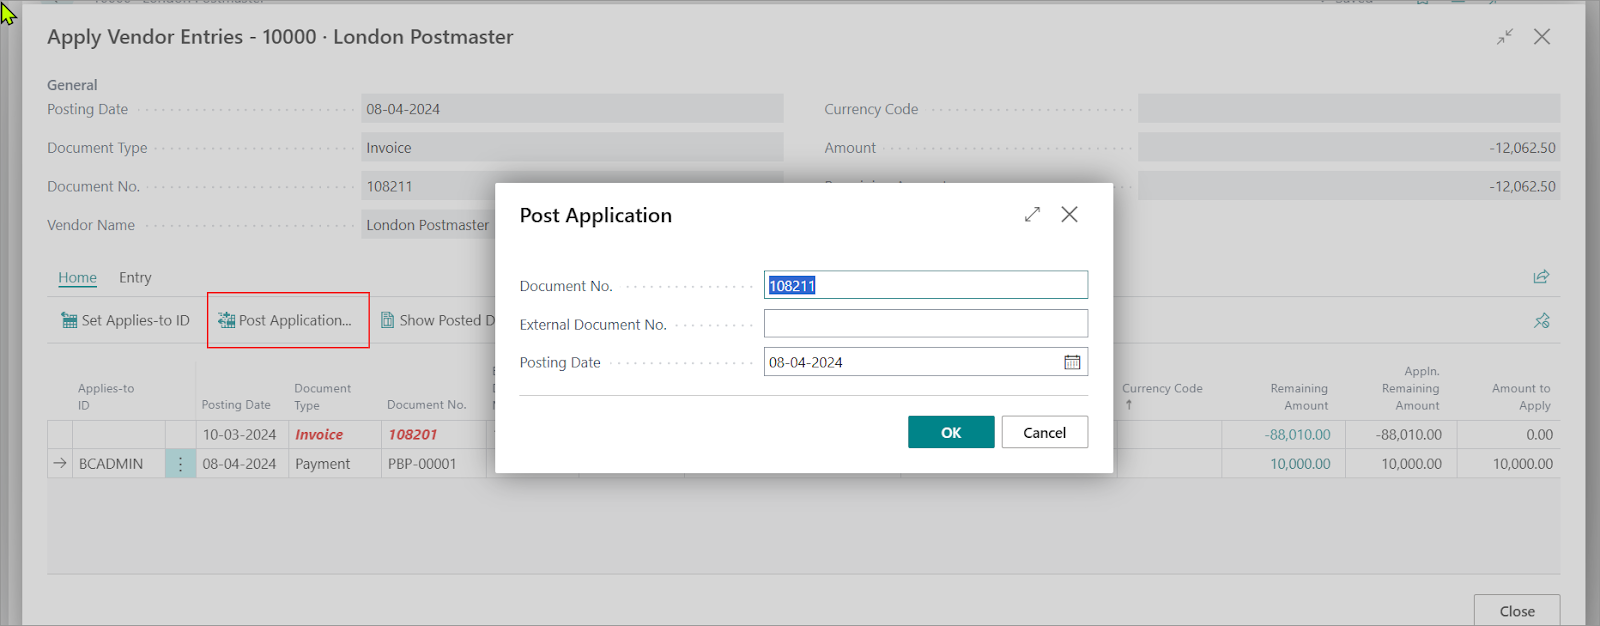
Screenshot 17 of 34 for “5 simple ways to apply vendor payment with vendor invoice”

Once we click ‘Ok’ to this screen, we can see the confirmation that application has been posted.
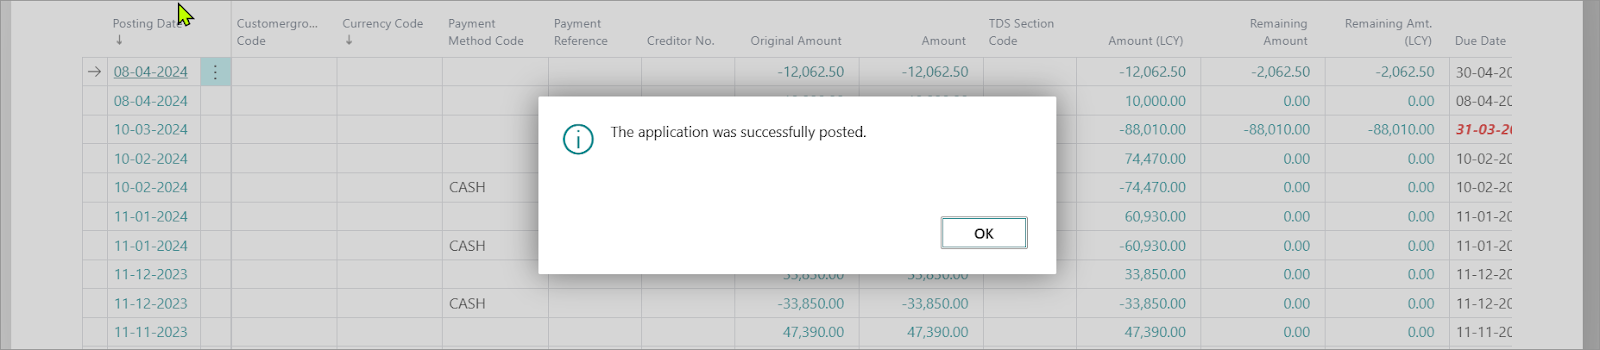
Screenshot 18 of 34 for “5 simple ways to apply vendor payment with vendor invoice”

The ‘Remaining Amount’ field shows the application has been done. Please note that you can always ‘Unapply’ an entry if you posted it by mistake or want to change it in the future. The option is as highlighted in the below screenshot.
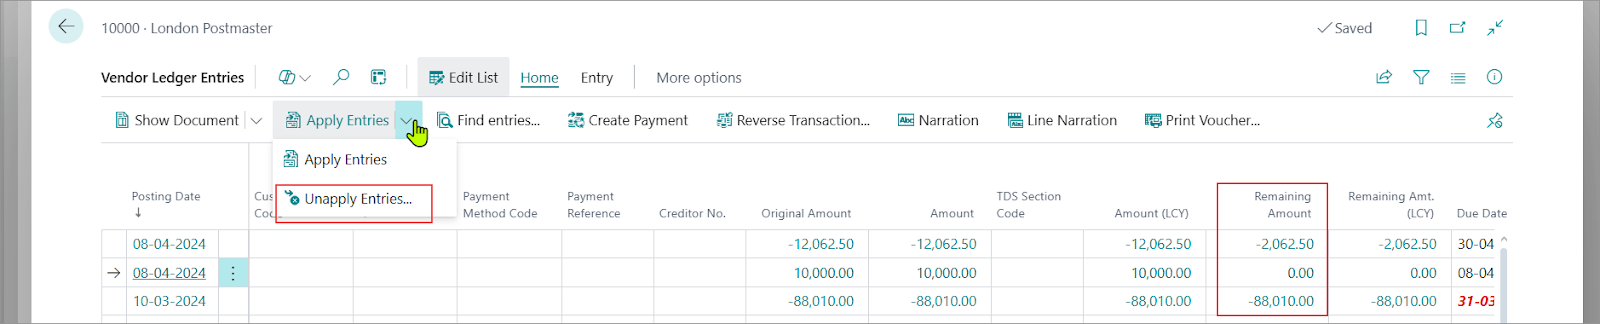
Screenshot 19 of 34 for “5 simple ways to apply vendor payment with vendor invoice”

3. Apply invoice when posting payment on journal
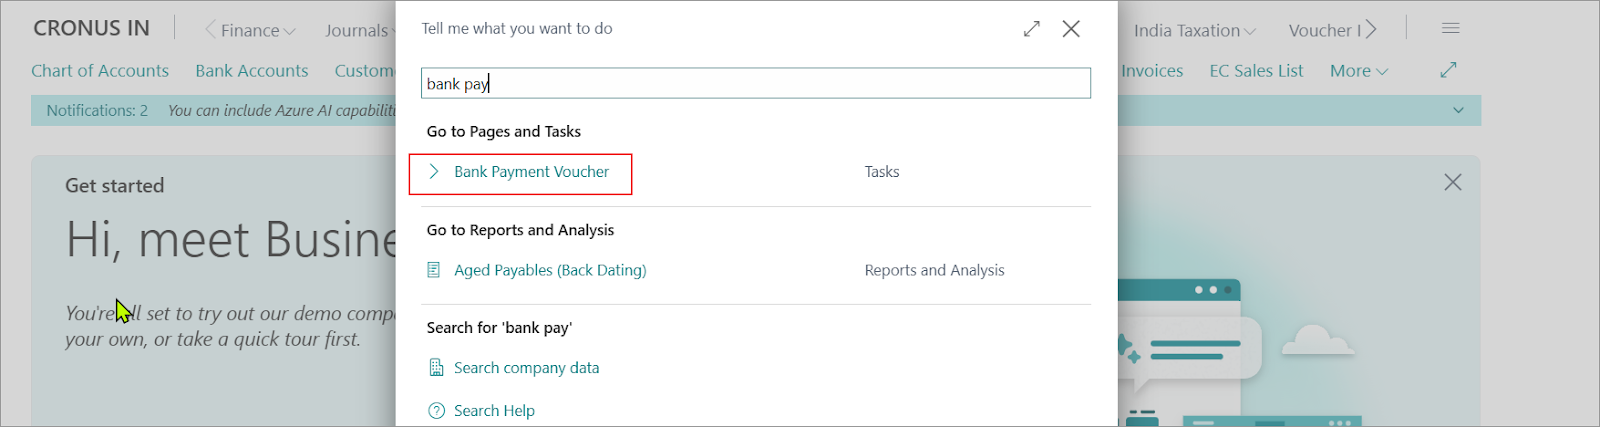
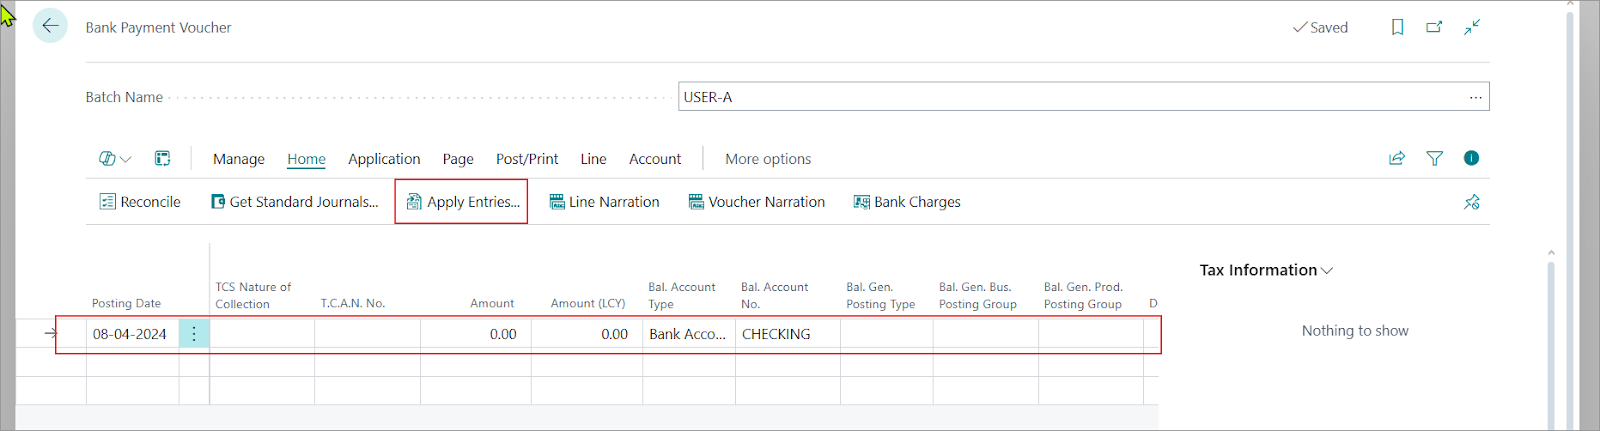
Usually, the invoices are posted first, and payments are received after. You can go to ‘Bank Payment Voucher’ to post a payment entry and apply it with invoice before posting.

Screenshot 20 of 34 for “5 simple ways to apply vendor payment with vendor invoice”

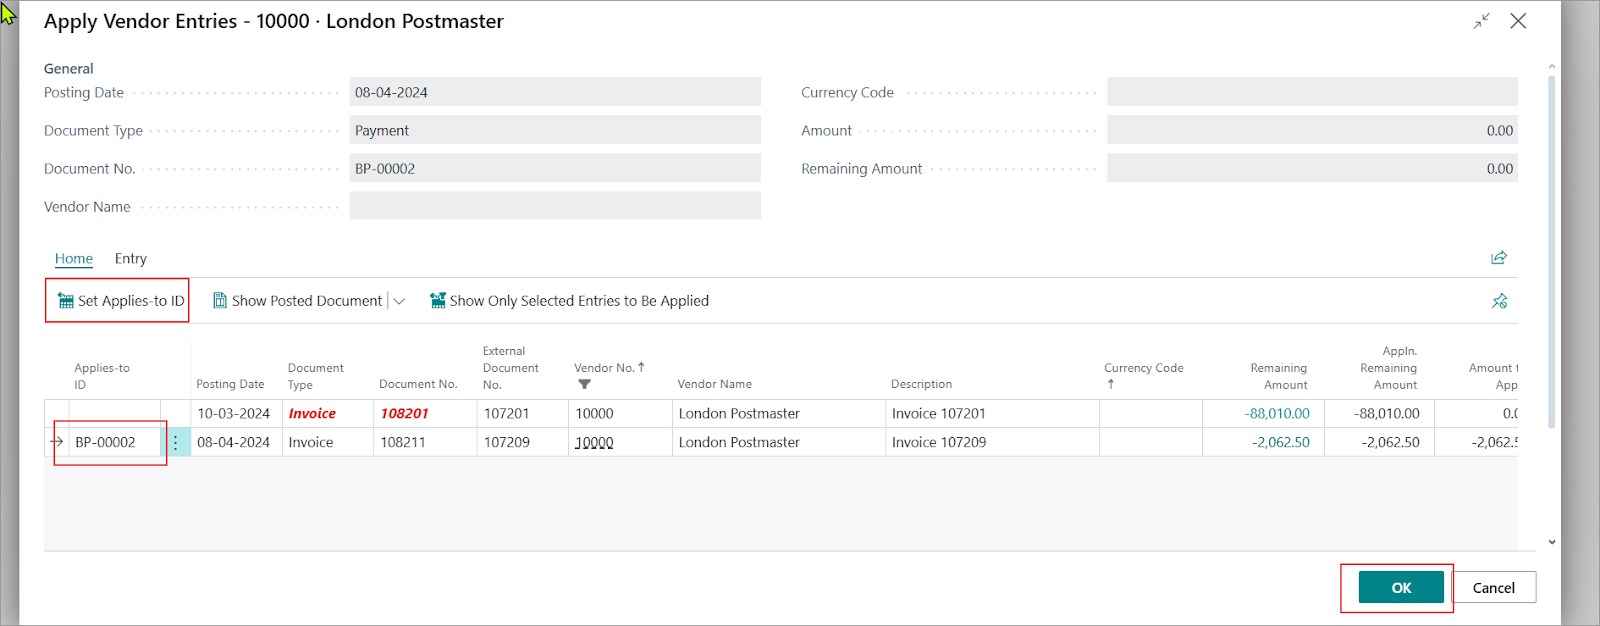
Create payment entry and click on ‘Apply Entries’ option. You can enter the amount or leave it blank. If you leave it blank you can expect to have the invoice amount filled in the amount field once you select the invoice for application.

Screenshot 21 of 34 for “5 simple ways to apply vendor payment with vendor invoice”

Let’s say we select one invoice and click ‘Set Applies-to ID’ option. In this case, we don’t have to post application. Just click ‘Ok’.

Screenshot 22 of 34 for “5 simple ways to apply vendor payment with vendor invoice”

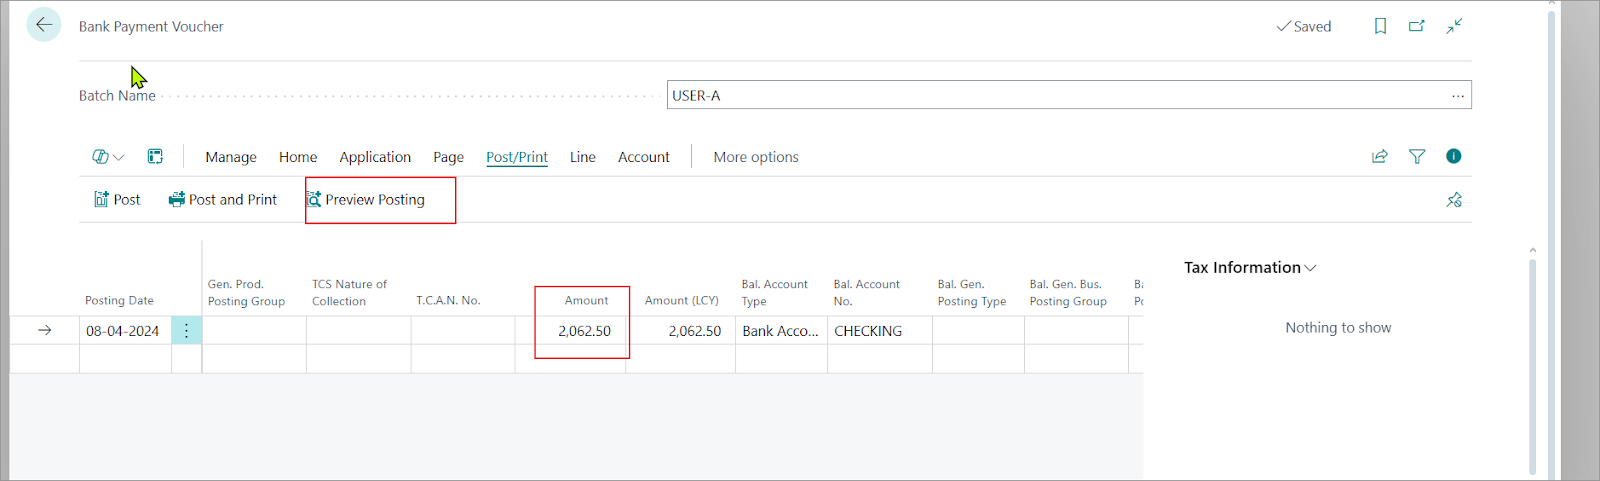
Here we have chosen to let system automatically give us the amount based on the invoice and not entered any amount. The application brings the value to the ‘Amount’ field.

Screenshot 23 of 34 for “5 simple ways to apply vendor payment with vendor invoice”

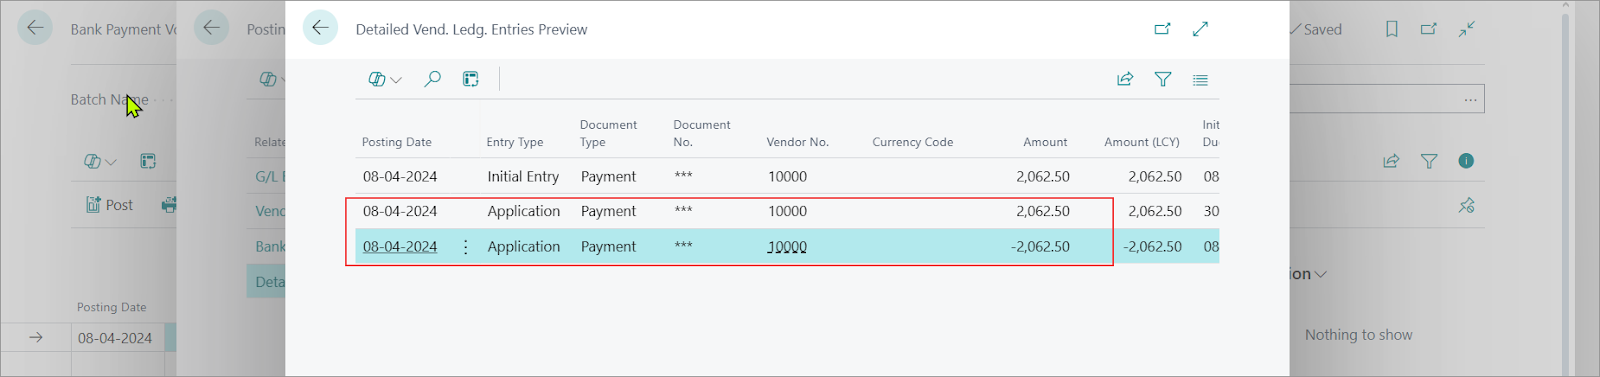
The preview posting shows how the entries got applied and we can proceed with posting.
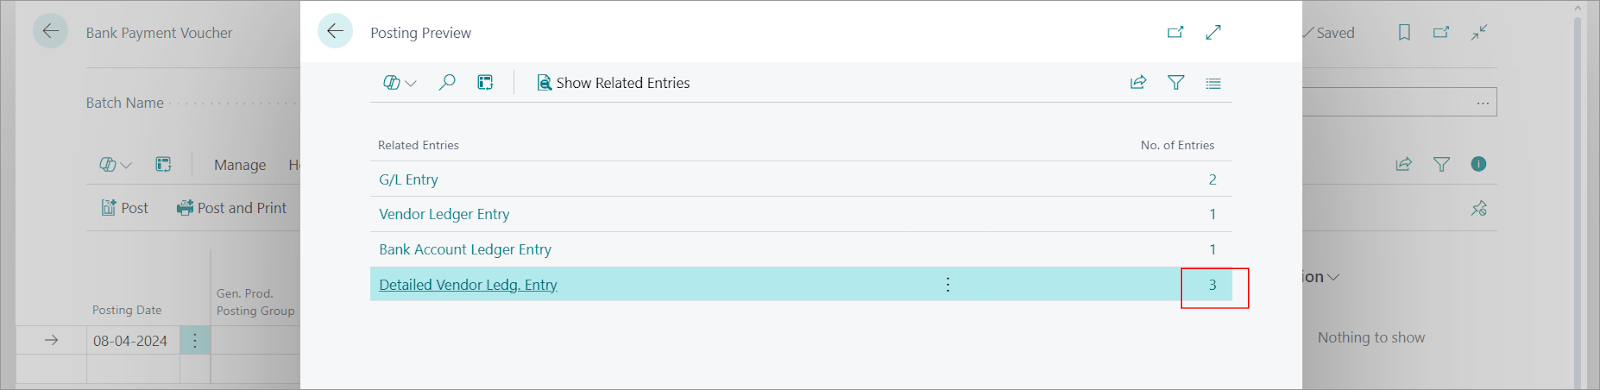
Screenshot 24 of 34 for “5 simple ways to apply vendor payment with vendor invoice”
Screenshot 25 of 34 for “5 simple ways to apply vendor payment with vendor invoice”

4. Payment from vendor card with application
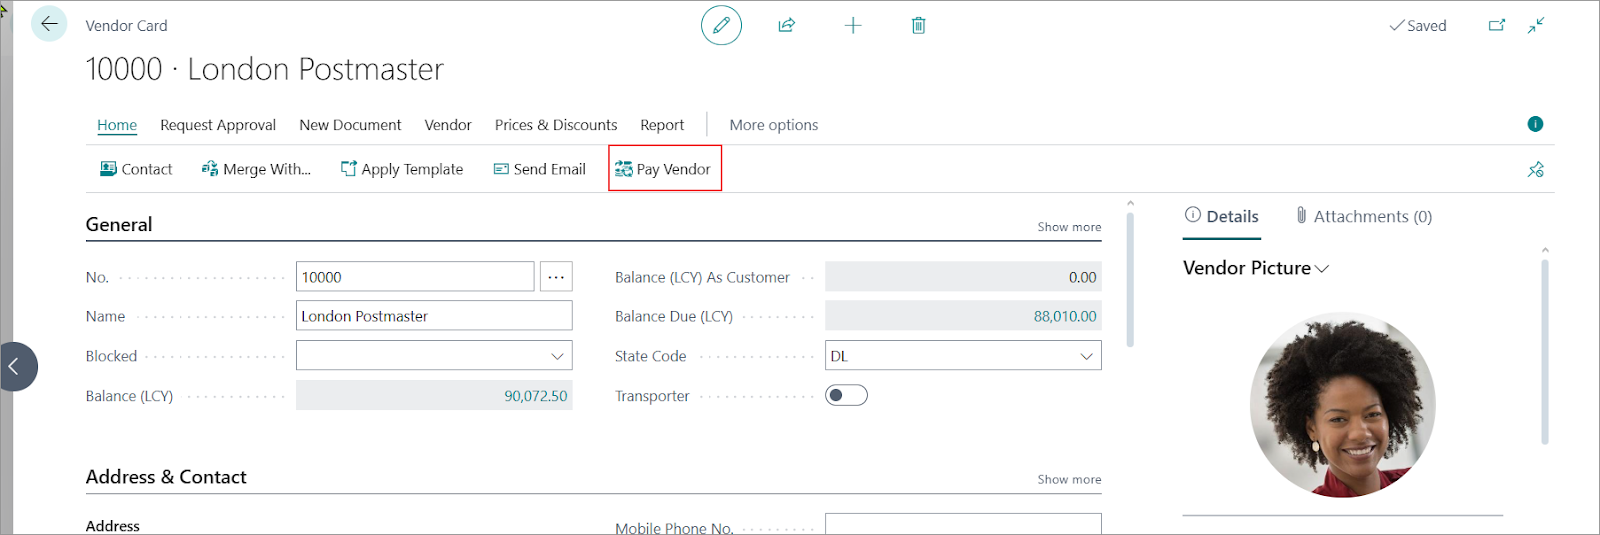
The latest and probably the most convenient method is making payment from vendor card.
Reach the vendor card and find the option called ‘Pay Vendor’

Screenshot 26 of 34 for “5 simple ways to apply vendor payment with vendor invoice”

It will show open invoices, and you can click on ‘Create Payment’ option to make the payment.

Screenshot 27 of 34 for “5 simple ways to apply vendor payment with vendor invoice”

You will see this window that helps select the batch, posting date, document number and bank account.
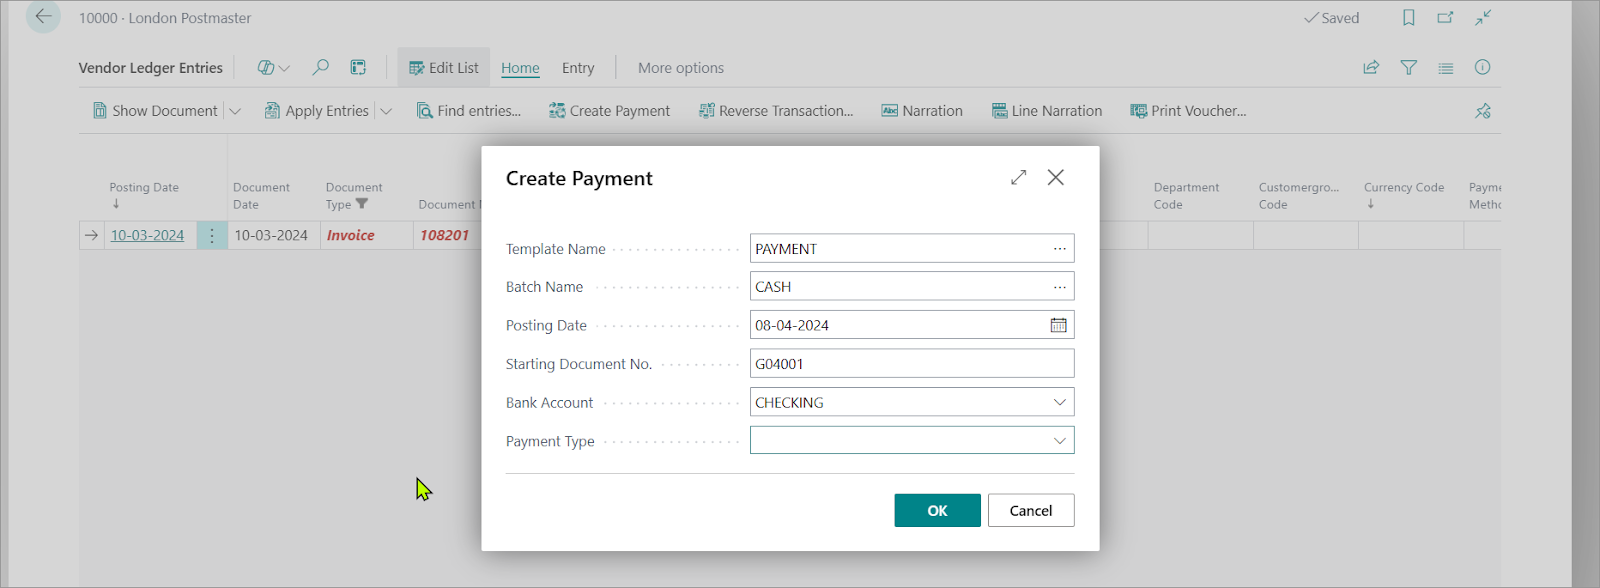
Screenshot 28 of 34 for “5 simple ways to apply vendor payment with vendor invoice”

When you hit ‘Ok’, you will find that the entry has been applied and is ready to be posted.
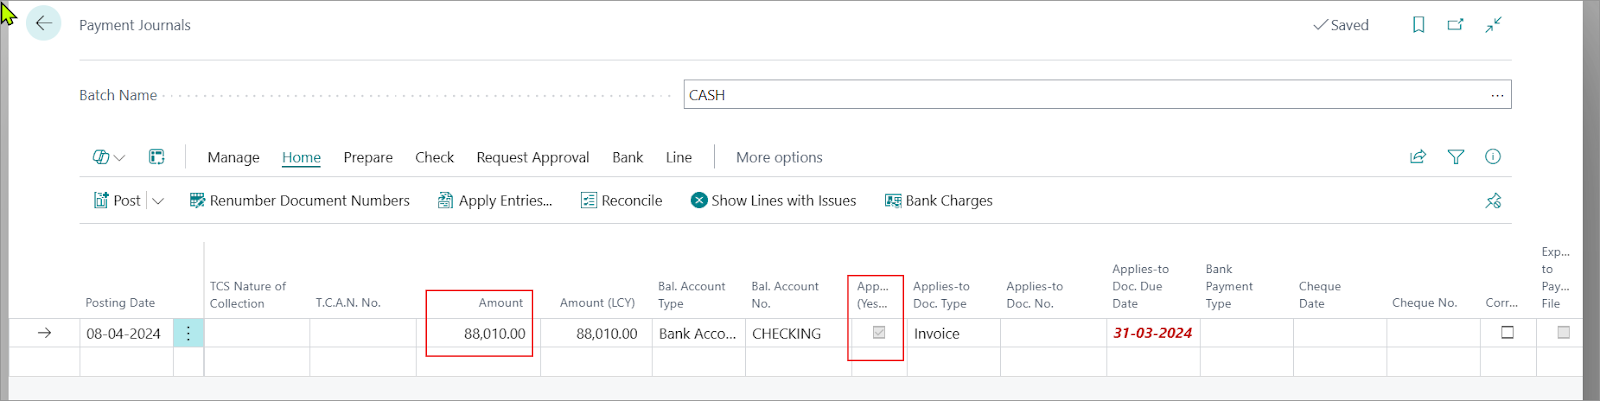
Screenshot 29 of 34 for “5 simple ways to apply vendor payment with vendor invoice”

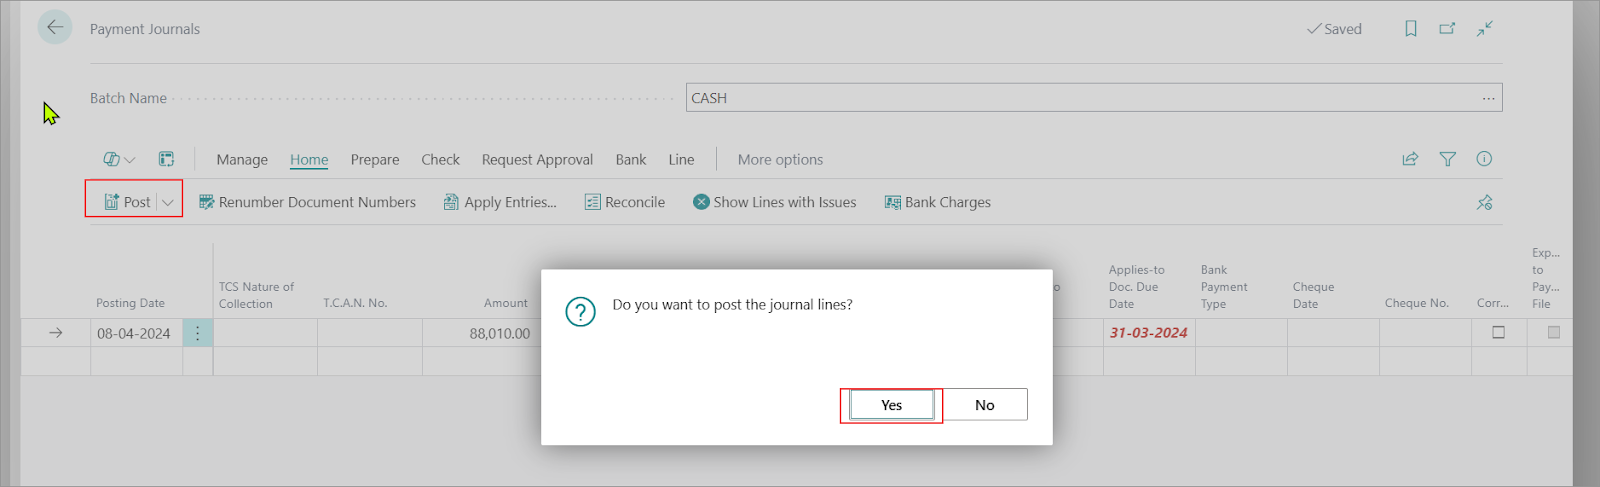
You click ‘Post’ to post the applied entry

Screenshot 30 of 34 for “5 simple ways to apply vendor payment with vendor invoice”

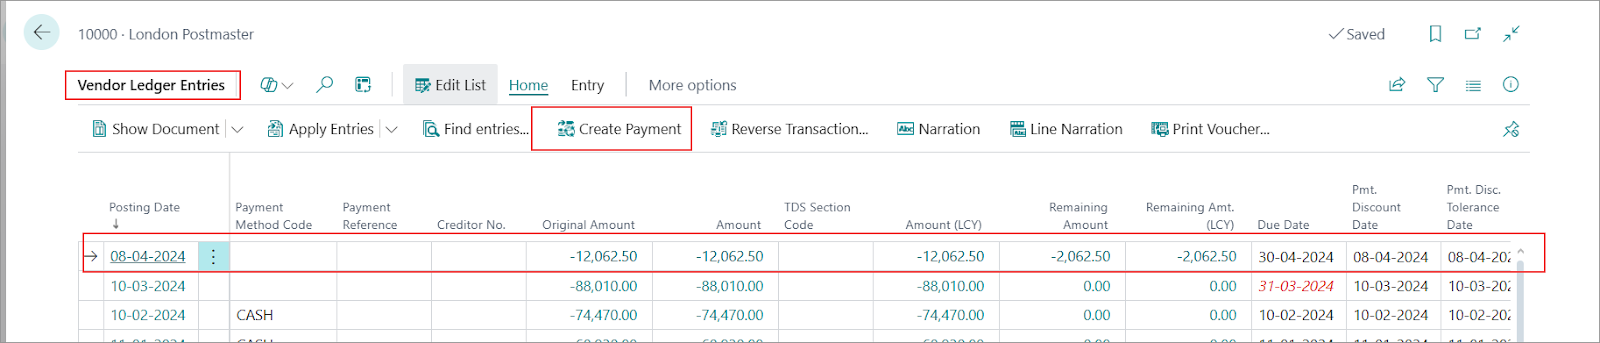
You will find that the entry has been posted.
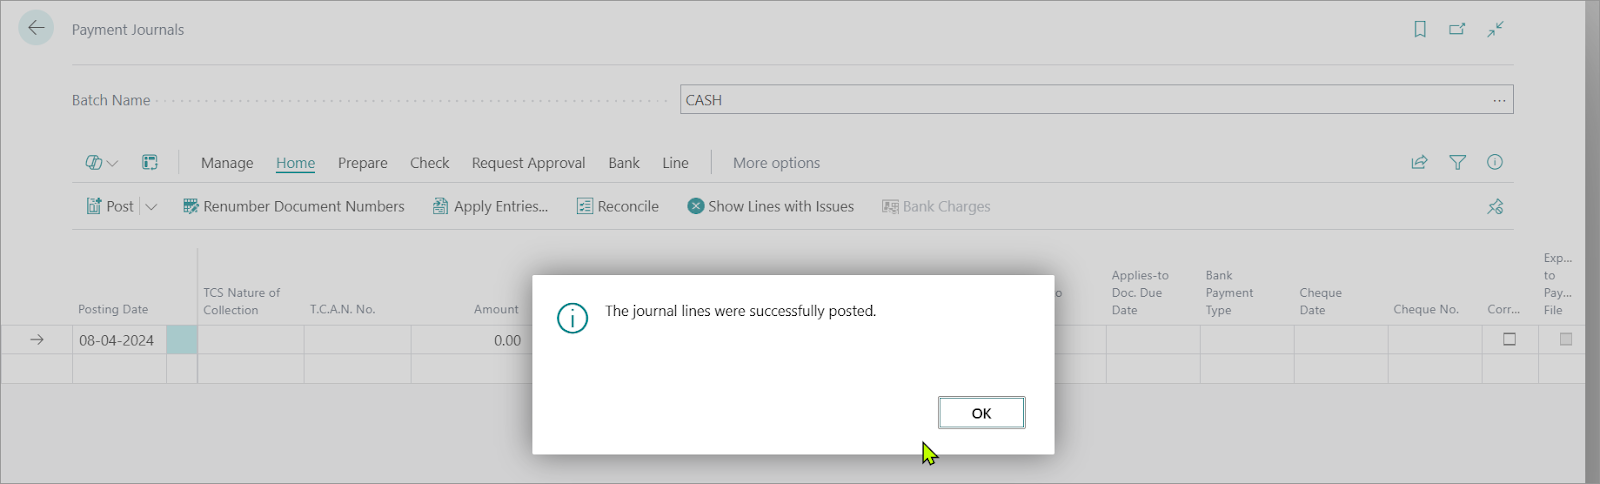
Screenshot 31 of 34 for “5 simple ways to apply vendor payment with vendor invoice”

5. Payment from vendor ledger

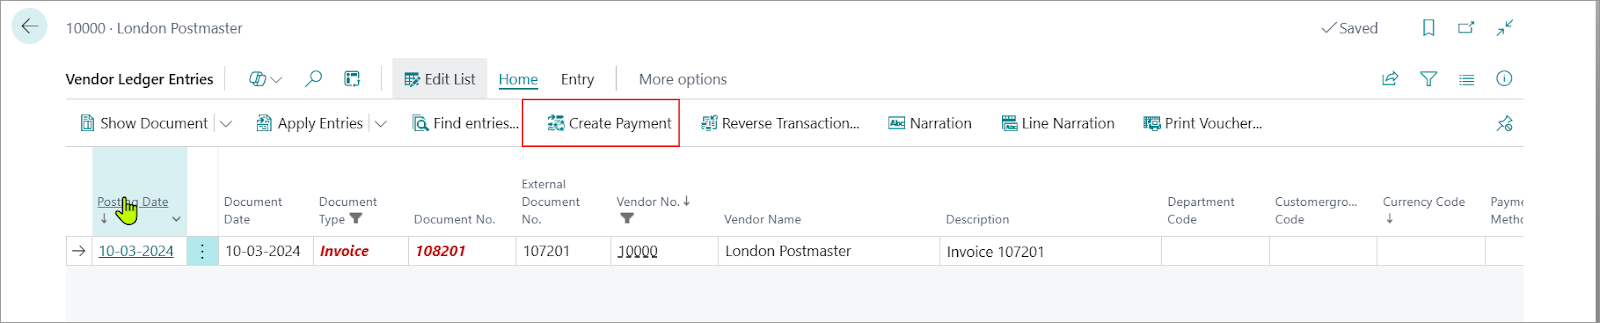
Let’s say the vendor is calling you regarding their specific invoice which they want you to clear. You check their ledger and find the invoice and check necessary details and decide to make payment immediately.

Screenshot 32 of 34 for “5 simple ways to apply vendor payment with vendor invoice”

You can click on ‘Create Payment’ option, and you will find the pop up to verify or update following info,
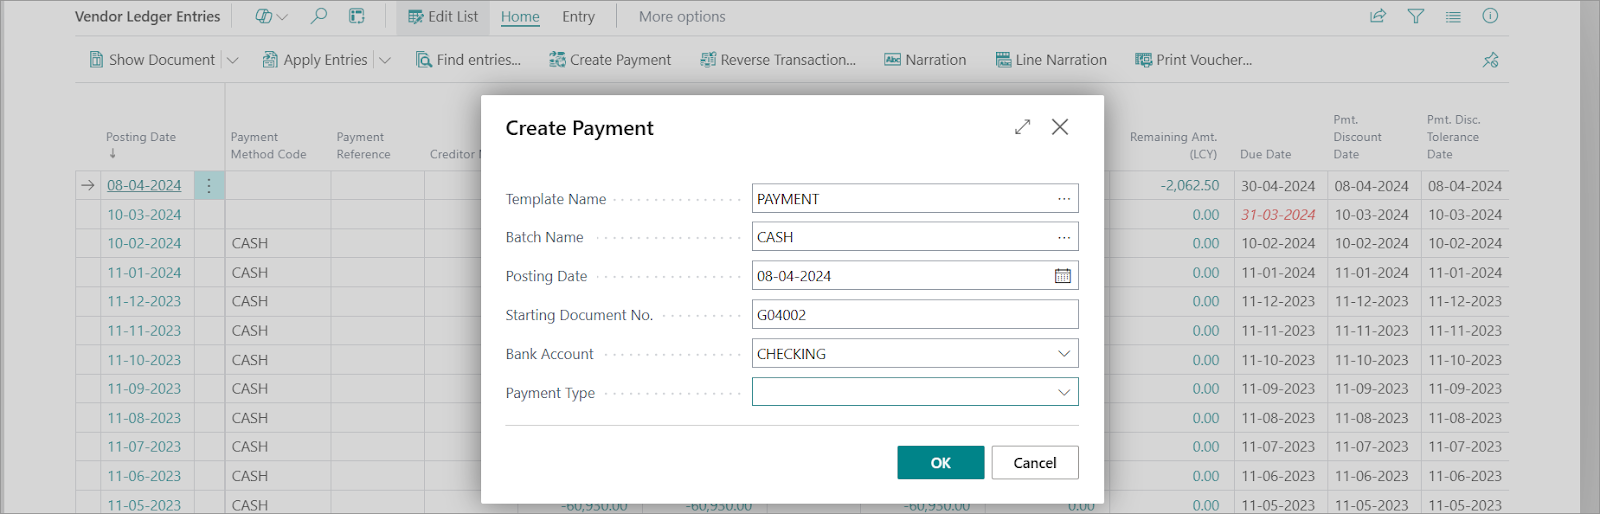
Screenshot 33 of 34 for “5 simple ways to apply vendor payment with vendor invoice”

Once you fill in the necessary details, click ‘Ok’
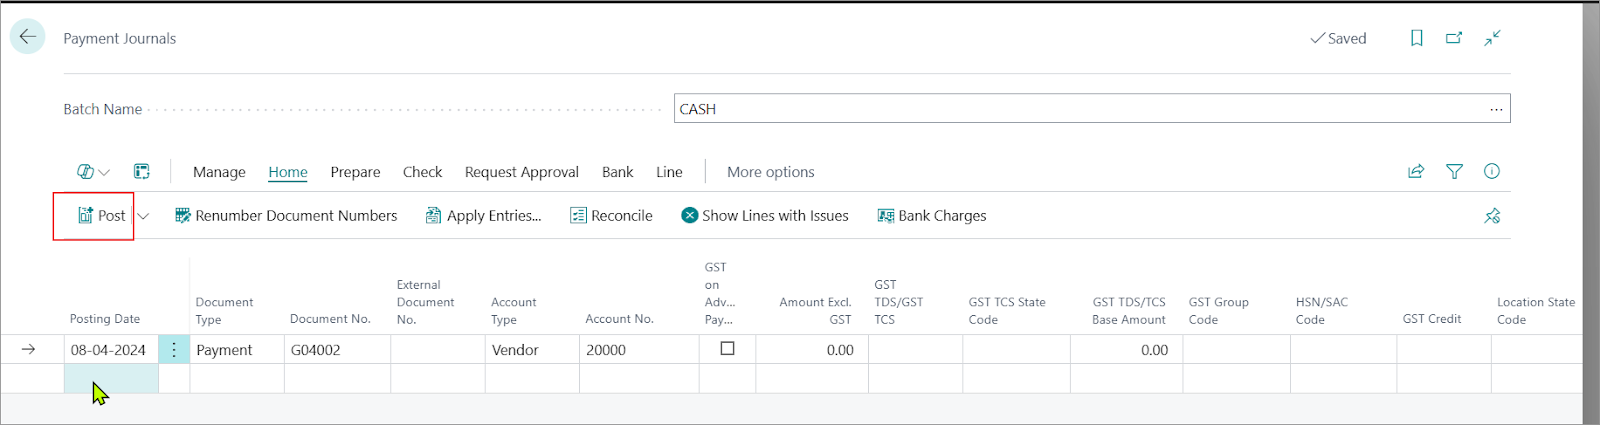
You will be taken to the payment journal where you can complete the payment entry.

Screenshot 34 of 34 for “5 simple ways to apply vendor payment with vendor invoice”

Post the payment and it will be already applied to the invoice you had selected.

Conclusion

Business Central offers multiple ways to apply payment with the invoice. Users can use one or multiple based on their business scenario. This same functionality works for customer as well when the receipt is posted and requires to be applied with the invoice.