

OBS Audio Fix for Windows 11: Clear, Loud Voice Straight Out of OBS (No Editing)
 By Jaimin Dave

On this page 27 sections
- What you'll do
- Step 1: Stop Windows from messing with your mic
- 1a. Turn off Audio enhancements
- 1b. Exclusive mode and format (Advanced tab)
- 1c. Set the input level
- Step 2: OBS audio settings (and two gotchas)
- Step 3: The mic filter chain (the magic part)
- 3a. Noise Suppression: RNNoise
- 3b. Noise Gate: silence between sentences
- 3c. Gain: make it loud enough
- 3d. Compressor: even out loud and soft
- 3e. Limiter: the safety net
- Step 4: Check your levels
- Step 5: Recording settings for YouTube
- Audio bitrate: 320 kbps
- Optional: a separate voice track as a backup
- Video
- Step 6: Where are my recordings?
- Troubleshooting
- Mic meter doesn't move
- Game or browser sound missing
- Voice cuts off at the ends of words
- Pumping or "breathing" sound
- Hiss, or a robotic voice
- Distorted or crackly voice
- Echo or doubled sound
- Cheat sheet
My recordings had two problems. My voice was too quiet, and there was a constant hiss and room noise behind it. I wanted to hit Stop Recording and upload straight to YouTube, with no audio editing afterwards.
This is the exact setup that fixed it. I'm writing it down as my own ready reckoner for the next time I set up a PC, and I hope it saves you a few hours too. It takes about 20 minutes.
What you'll do
- Stop Windows from messing with your mic
- Set up OBS audio devices (and fix two gotchas)
- Add five filters to your mic, in the right order
- Check your levels
- Set up recording for YouTube
- Find your recordings
Step 1: Stop Windows from messing with your mic
Windows and some audio drivers add their own "enhancements" to your mic. They fight with OBS's filters and can make your voice sound pumpy or robotic. Switch them off first.
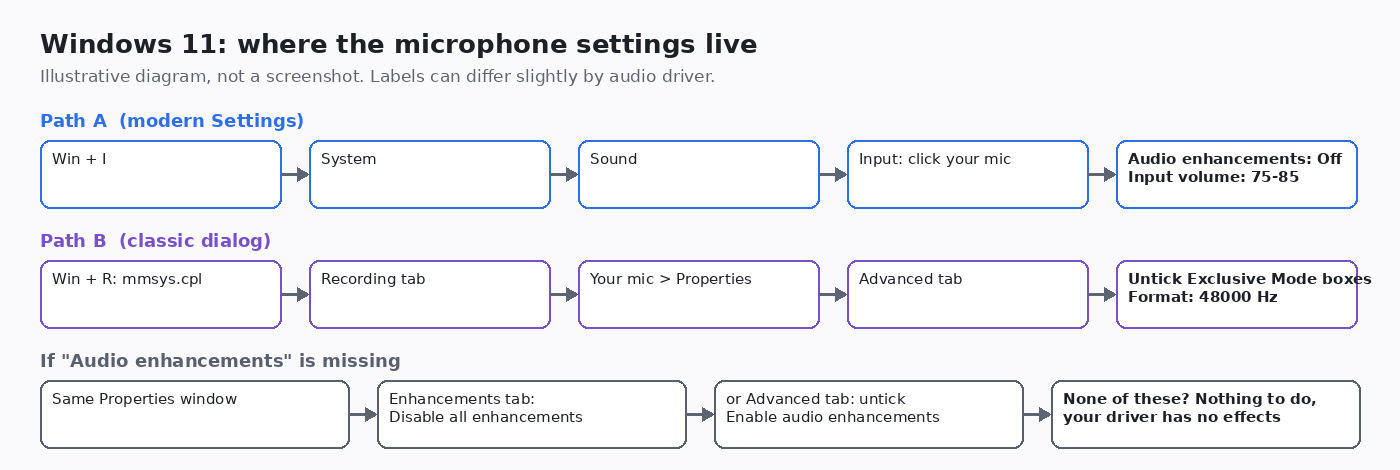
1a. Turn off Audio enhancements
- Press Win + I to open Settings, then go to System > Sound.
- Under Input, click your microphone (the one you actually talk into).
- Find Audio enhancements and set it to Off. On some PCs it's a toggle called Enhance audio. If so, turn it off.
Don't see "Audio enhancements"? That's normal. I didn't have it either. It only shows up when your driver offers effects. Check here instead:
- On the same mic page, click Additional device properties (sometimes under Device properties). You can also press Win + R, type
mmsys.cpl, press Enter, open the Recording tab, right-click your mic and choose Properties. - If there's an Enhancements tab, tick Disable all enhancements (or Disable all sound effects).
- If not, look in the Advanced tab for Enable audio enhancements and untick it.
- If neither option is there, your driver adds no effects, so there's nothing to turn off. Move on.
1b. Exclusive mode and format (Advanced tab)
In the same Properties window, open the Advanced tab:
- Default Format: pick an option with 48000 Hz, for example "2 channel, 16 bit, 48000 Hz (DVD Quality)". A mono mic will show "1 channel". That's fine. Just pick 48000 Hz. Windows 11 also shows this as Format on the mic's Settings page.
- Exclusive Mode: untick Allow applications to take exclusive control of this device. The second box, Give exclusive mode applications priority, greys out by itself. Now Discord, a game or a browser can't grab the mic and lock OBS out.
- Click Apply, then OK.
1c. Set the input level
Back on the mic's page in Settings > System > Sound, set Input volume to around 75 to 85. Don't push it to 100. Max volume (and "Microphone Boost" in the Levels tab, if you have it) often adds hiss. We'll get the rest of the loudness cleanly inside OBS.
Step 2: OBS audio settings (and two gotchas)
Open OBS and go to File > Settings > Audio (or click Settings at the bottom right).
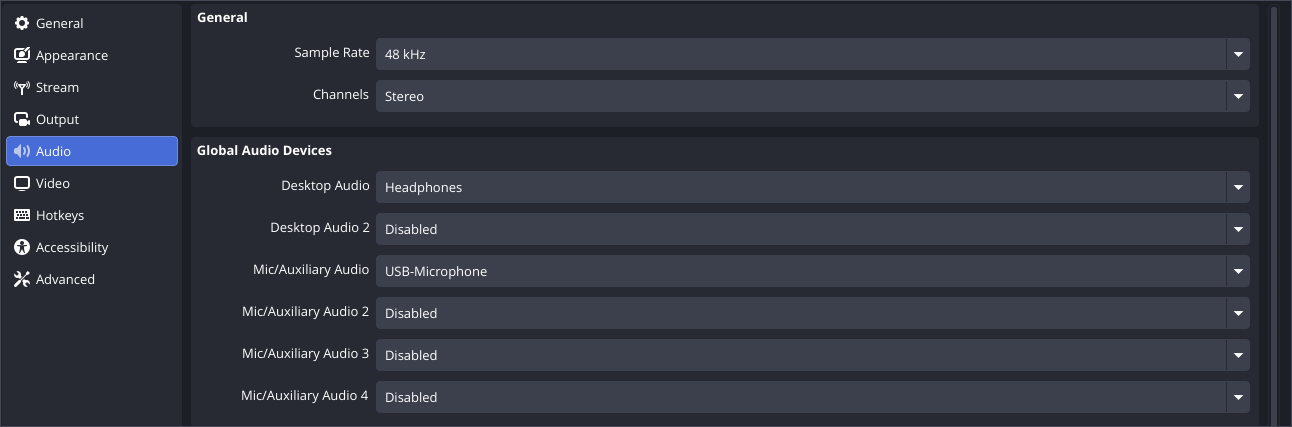
- Sample Rate: 48 kHz (it's the default, but check it). Channels: Stereo.
- Desktop Audio: pick the speakers or headphones you actually listen on. Don't leave it on Default or Disabled.
- Mic/Auxiliary Audio: pick your actual microphone by name, not Default.
- Set any devices you don't use to Disabled. Click Apply.
Gotcha 1: the mic was muted. On my PC, Mic/Aux was muted in the Audio Mixer, and its meter didn't move however loud I talked. If you see a red speaker icon next to Mic/Aux, click it to unmute.
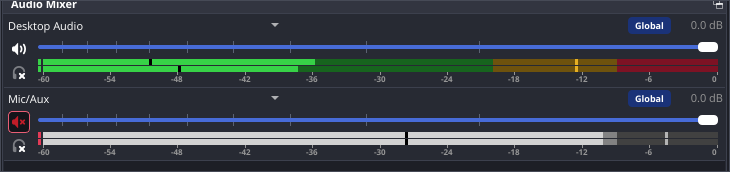
Gotcha 2: no game sound in the recording. I recorded a browser game with Display Capture, but the game audio was missing. Display Capture records only the picture. The sound comes from the Desktop Audio device. Once I set Desktop Audio to my actual headphones/speakers (instead of Default), the game sound came through. If the game plays through a different device than Windows' default, this is almost always the reason.
Step 3: The mic filter chain (the magic part)
In the Audio Mixer, right-click Mic/Aux (or click its ⋮ menu) and choose Filters.
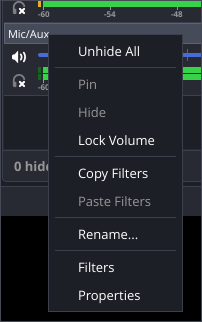
Click the + at the bottom left of the Filters window to add each filter. Add them in this exact order, top to bottom:
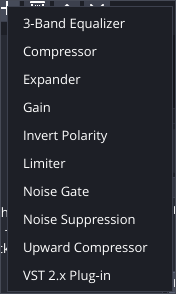
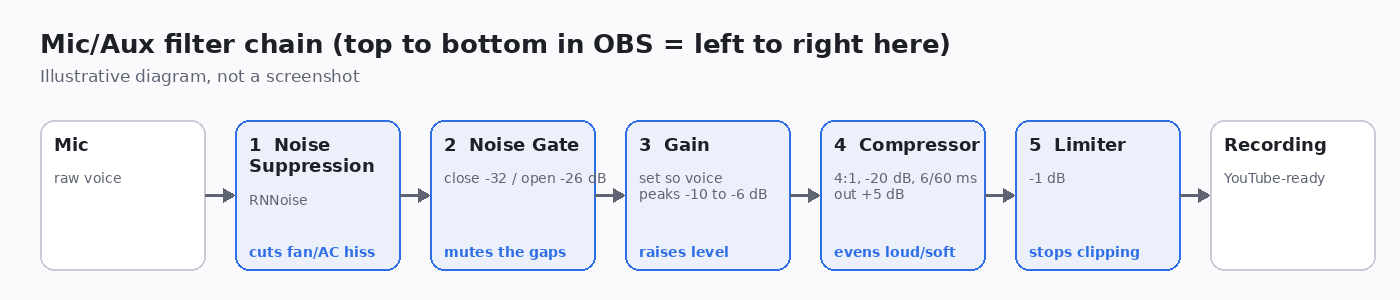
Why the order matters: each filter works on what the one above it sends down. Clean the noise first, so the gate and compressor don't treat hiss as voice. Raise the level before compressing. Put the limiter last, so nothing can slip past it and clip.
3a. Noise Suppression: RNNoise
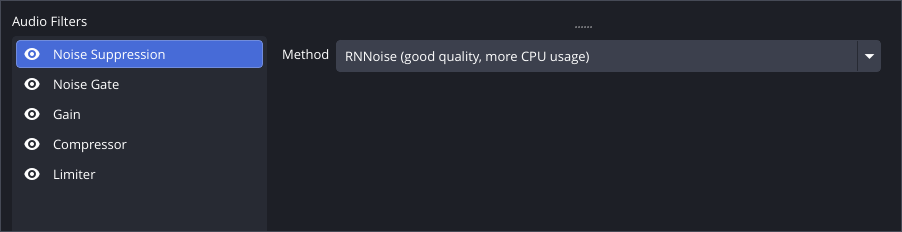
- Method: RNNoise (good quality, more CPU usage)
- It uses AI to remove steady noise like fans, AC and PC hum. It uses a little more CPU than Speex but sounds much more natural. (NVIDIA RTX cards also get an NVIDIA noise removal option. AMD and Intel users, stick with RNNoise.)
3b. Noise Gate: silence between sentences
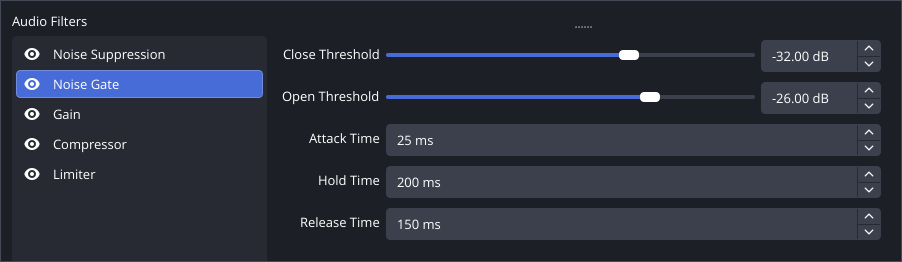
- Close Threshold: -32 dB
- Open Threshold: -26 dB
- Attack 25 ms, Hold 200 ms, Release 150 ms: leave these at the defaults.
- The gate opens when you speak above -26 dB and closes when you drop below -32 dB, so the gaps between your words are clean silence. (These values are OBS's defaults. Just check them.)
3c. Gain: make it loud enough
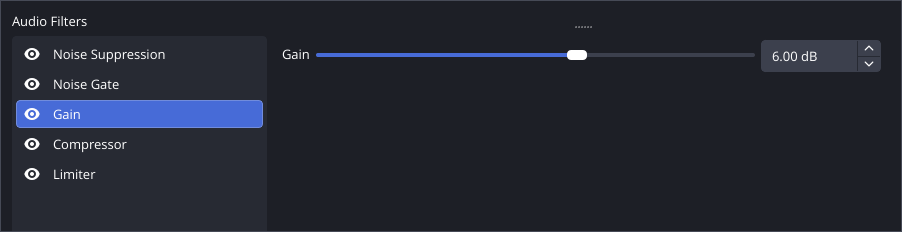
- Gain: start at +6 dB, then adjust while you talk normally until your voice peaks around -10 to -6 dB on the Mic/Aux meter (see Step 4).
- There's no magic number for this one. A quiet USB mic may need +10 dB, and a loud one 0 dB.
3d. Compressor: even out loud and soft
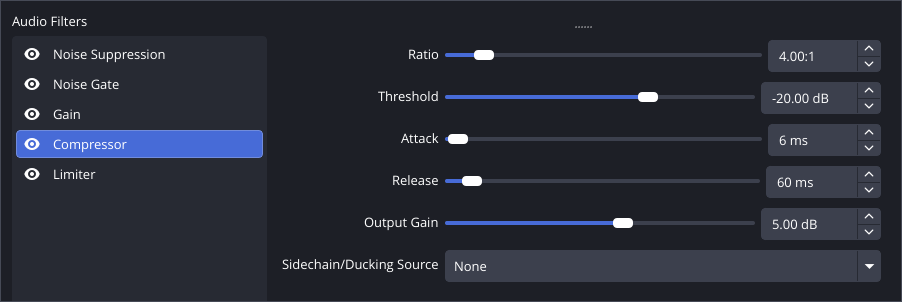
- Ratio: 4:1
- Threshold: -20 dB
- Attack: 6 ms
- Release: 60 ms
- Output Gain: +5 dB
- Sidechain/Ducking Source: None
- It turns down your loud moments (laughing, shouting) so you can raise everything without blasting viewers. The +5 dB output gain lifts the quiet words back up.
3e. Limiter: the safety net
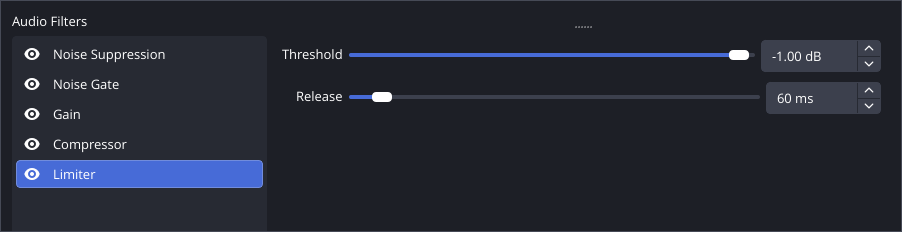
- Threshold: -1 dB
- Release: 60 ms (default)
- Nothing gets past -1 dB, so a sudden shout can't distort.
Click Close. The filters save automatically.
Step 4: Check your levels
Talk the way you normally would in a video (and play some game audio) while you watch the Audio Mixer:
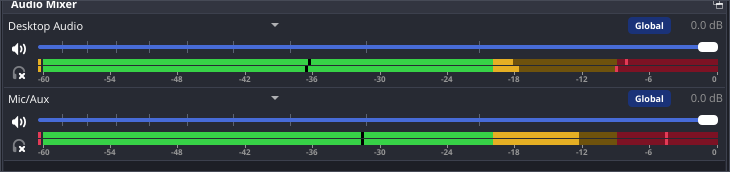
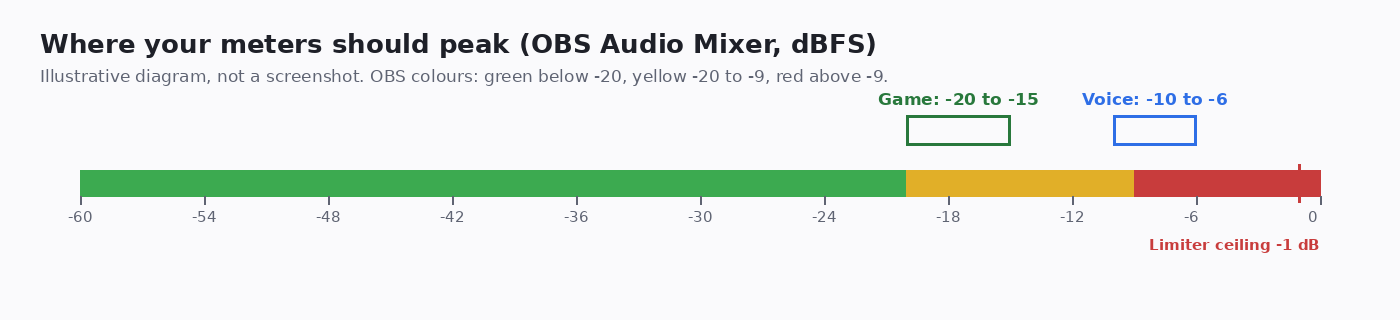
- Voice (Mic/Aux): peaks around -10 to -6 dB, the top of the yellow zone, just touching red on loud words. If you're mostly in green, add Gain (3c). If you're hitting near 0, lower it.
- Game / desktop: peaks around -20 to -15 dB, roughly where green turns yellow. Use the Desktop Audio fader to set it. Your voice should always sit clearly above the game.
- Keep both faders around 0 dB and do the loudness work with the Gain filter.
- Do a 30-second test recording and listen with headphones before you record the real thing.
Step 5: Recording settings for YouTube
Go to Settings > Output and set Output Mode to Advanced, then open the Recording tab.
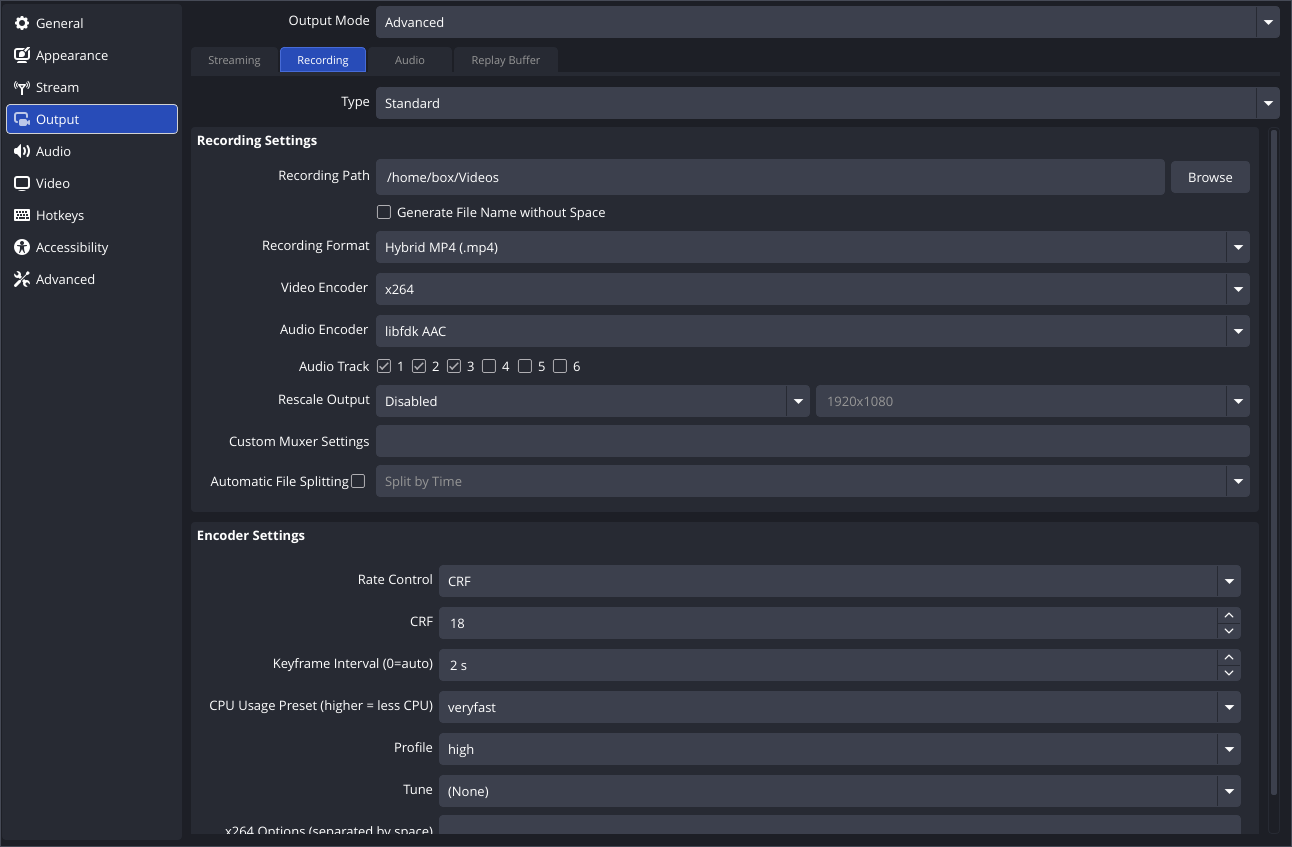
| Setting | What I use |
|---|---|
| Type | Standard |
| Recording Path | A folder you'll find again (default is C:\Users\<you>\Videos) |
| Recording Format | Hybrid MP4 (.mp4) |
| Video Encoder | AMD HW H.264 (AVC). NVIDIA: NVIDIA NVENC H.264. Intel: QuickSync H.264 |
| Audio Encoder | AAC (default) |
| Audio Track | 1 (plus 2 and 3 if you want backups, see below) |
| Rate Control | CQP (Intel QuickSync: ICQ) |
| CQ Level | 18 to 20 (lower = better quality, bigger files) |
| Keyframe Interval | 2 s |
| Preset / Profile | Quality / High |
| Max B-frames | 0 (OBS's recommendation for AMD) |
Why Hybrid MP4? It's the default for new profiles since OBS 32. If OBS or your PC crashes, the file can still be recovered, like MKV, and it opens in every editor like a normal MP4. On an older OBS (before 30.2), record in MKV and convert it with File > Remux Recordings.
Audio bitrate: 320 kbps
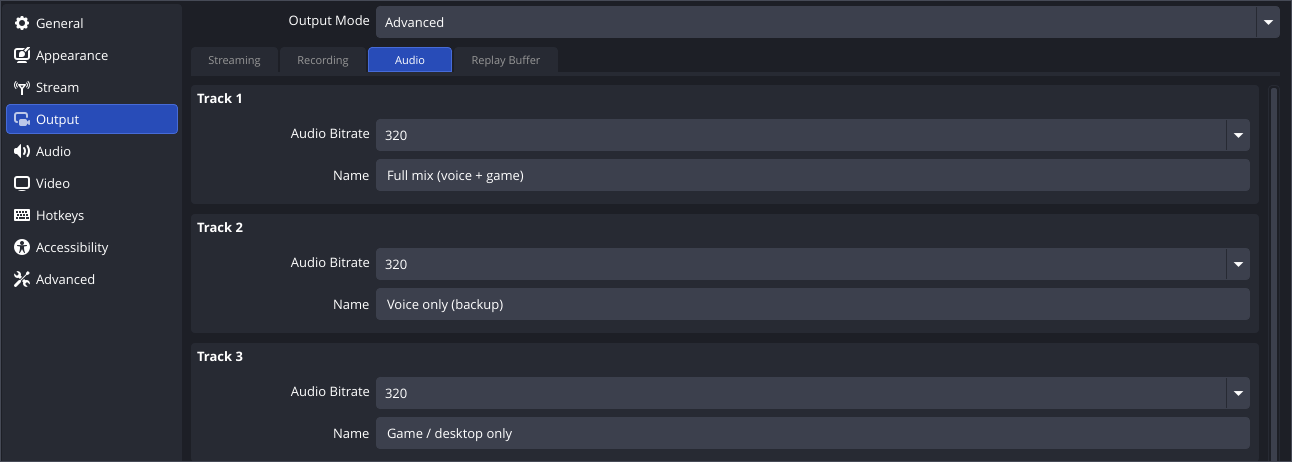
In the Audio tab (next to Recording), set Audio Bitrate to 320 for the tracks you record.
Optional: a separate voice track as a backup
It costs nothing and has saved people's videos. Track 1 is the full mix you upload. Track 2 is your voice alone, in case you ever need to fix something.
- Tick Audio Track 1, 2 and 3 in Output > Recording.
- Go to Edit > Advanced Audio Properties and set Desktop Audio to tracks 1 + 3 and Mic/Aux to tracks 1 + 2.

YouTube plays only the first track, so you can still upload the file as it is. I tested this setup: the recording came out as Hybrid MP4 with three 320 kbps, 48 kHz AAC tracks.
Video
- Sources: + > Display Capture for browser games, tutorials and training videos. Use Game Capture for full-screen games.
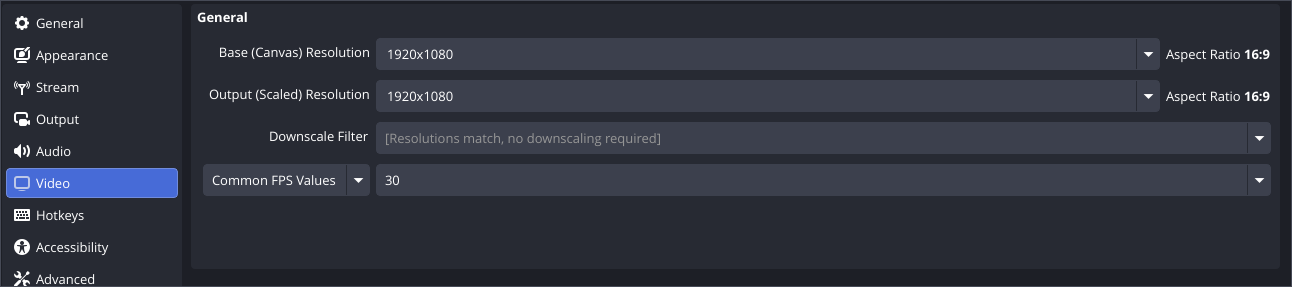
- Settings > Video: Base (Canvas) = your monitor resolution, Output (Scaled) = 1920x1080. Set FPS to 30 for talking or tutorials, and 60 for gameplay.
Step 6: Where are my recordings?
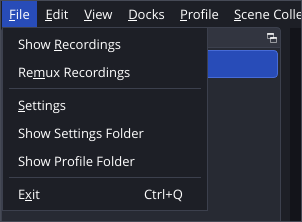
- File > Show Recordings opens the folder straight away.
- Or check Settings > Output > Recording > Recording Path.
Troubleshooting
Mic meter doesn't move
- Is there a red speaker icon? Unmute Mic/Aux.
- In Settings > Audio, pick your mic by name (not Default or Disabled).
- Windows: Settings > Privacy & security > Microphone. Turn on Microphone access and Let desktop apps access your microphone.
- Untick exclusive mode (Step 1b) and restart OBS.
- Check the eye icons in Filters. If the meter moves only when you shout, the noise gate is too high (see below).
Game or browser sound missing
- Set Desktop Audio to the exact headphones/speakers you're listening on, not Default.
- Check the browser tab or game isn't muted, and that the Desktop Audio fader isn't all the way down.
- Display Capture never records sound by itself. The sound always comes from Desktop Audio.
Voice cuts off at the ends of words
- The gate is closing too early. Lower it to Close -38 dB / Open -32 dB, or raise Hold to 300 ms.
- Is your mic quiet? The gate sits before Gain, so raise the Windows input volume a little.
Pumping or "breathing" sound
- The compressor is working too hard. Try a 3:1 ratio or a -18 dB threshold, and lower Output Gain to +3 dB.
Hiss, or a robotic voice
- Lower the Windows Input volume or Microphone Boost, and add the loudness back with the OBS Gain filter instead.
- Make sure Noise Suppression is the first filter and set to RNNoise.
- Sit closer to the mic (a hand's width away is ideal).
Distorted or crackly voice
- The peaks are hitting 0 dB. Lower the Gain filter until they stay around -6 dB.
Echo or doubled sound
- In Edit > Advanced Audio Properties, untick Audio Monitoring > Enable for your sources, unless you need to hear them.
Cheat sheet
| Where | Setting | Value |
|---|---|---|
| Windows: mic page | Audio enhancements | Off (or Enhancements tab > Disable all) |
| Windows: mic page | Input volume | 75 to 85 |
| Windows: mic Properties > Advanced | Default Format | 48000 Hz |
| Windows: mic Properties > Advanced | Exclusive Mode (both boxes) | Unticked |
| OBS Settings > Audio | Sample Rate / Channels | 48 kHz / Stereo |
| OBS Settings > Audio | Desktop Audio | Your actual speakers/headphones |
| OBS Settings > Audio | Mic/Auxiliary Audio | Your actual mic |
| Audio Mixer | Mic/Aux | Unmuted |
| Filter 1 | Noise Suppression | RNNoise |
| Filter 2 | Noise Gate | Close -32 dB, Open -26 dB, 25 / 200 / 150 ms |
| Filter 3 | Gain | Adjust, start at +6 dB |
| Filter 4 | Compressor | 4:1, -20 dB, 6 ms, 60 ms, +5 dB |
| Filter 5 | Limiter | -1 dB, 60 ms |
| Meters | Voice peaks | -10 to -6 dB |
| Meters | Game / desktop peaks | -20 to -15 dB |
| Output > Recording | Format | Hybrid MP4 |
| Output > Recording | Encoder | AMD HW H.264 (AVC) / NVENC H.264 / QuickSync H.264 |
| Output > Recording | Rate control | CQP, CQ 18 to 20 (Intel: ICQ) |
| Output > Audio | Bitrate | 320 kbps |
| Optional | Tracks | 1 = mix, 2 = voice, 3 = game |
| Settings > Video | Output / FPS | 1920x1080 / 30 (talk) or 60 (games) |
| Recordings | Folder | File > Show Recordings |
That's it. Set it once and every recording after that comes out ready to upload. I now use this same setup for gameplay, tutorials and training videos.
Verified on OBS Studio 33.0.1 and Windows 11, 10 November 2026. OBS menus can move between versions, so if something looks different, check the version number in Help > About.